

Creating a Backup Set

Summary:
- This article is for Windows only
This article describes how to create a Backup set with Carbonite Safe Server Backup.
Solution:
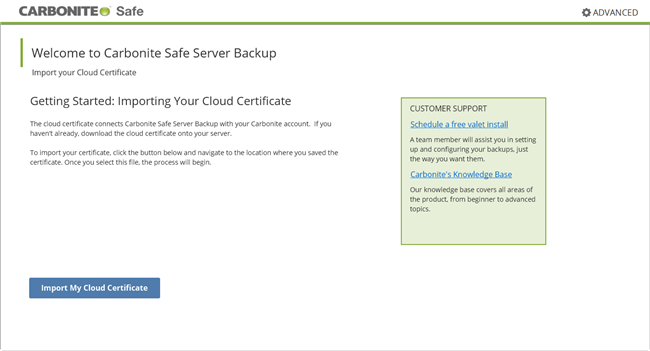
After launching Carbonite Safe Server Backup (CSSB) for the first time, you will be presented with a Welcome to Carbonite Safe Server Backup! window. On this screen, you will be able to perform the following actions:
- Download and import your cloud certificate - The cloud certificate connects Carbonite to your account. You will have to download and import your cloud certificate to begin backing up.
- Schedule a free valet install - A customer care agent will assist you with setting up and configuring your backups on your system.
- Access the CSSB Knowledge Base - The Knowledge Base is a great resource where you can view self-help articles and video tutorials about the product.
Click image to enlarge
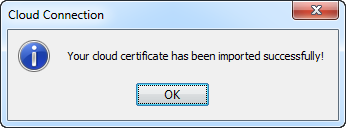
If you choose to configure your own backups, we recommend downloading and importing your cloud certificate. Once your cloud certificate has been successfully imported, you will receive a notification message. Click OK to close the window.
Backup Set
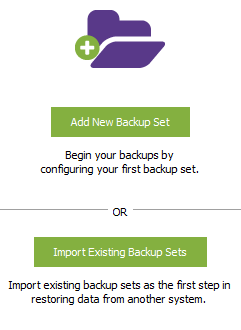
You will then be given the choice to either configure your first backup set or import existing backup sets.
A backup set defines the parameters for backing up a group of directories or an application. You can only select one backup type for each backup set. For example, you cannot back up an Exchange server and Windows System state in the same backup set. Instead, you must create a new backup set for each type of backup.
Note: Backup set names are limited to 32 characters. You cannot use Windows reserved characters, such as /, |, ?, _, ., <, >, *, ”, +, &.
Adding a Backup Set
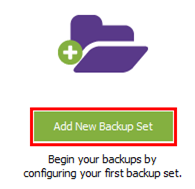
To add a new backup set, launch Carbonite Safe Server Backup and click Add New Backup Set.
Note: You can also create additional backup sets by clicking File from the menu bar and selecting New Backup Set, or by clicking Add New Backup Set in the left hand pane.
A new pane will appear and give you the option to choose a backup set type, such as a File System, System State, SQL Server, etc.
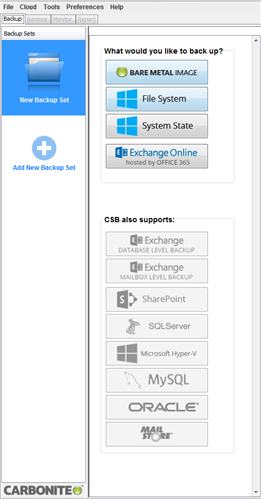
After making your selection, you will be required to name your backup set. The name must meet the following requirements:
- It cannot include special characters.
- It cannot be more than 32 characters.
- It cannot have more than one space in between words.
- It cannot have the same name as another backup set.

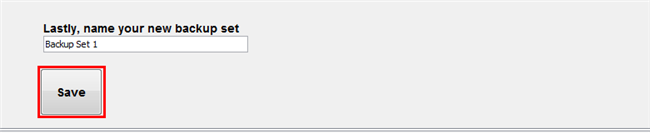
Click image to enlarge
After entering the name of your backup set and selecting files for backup, click Save.
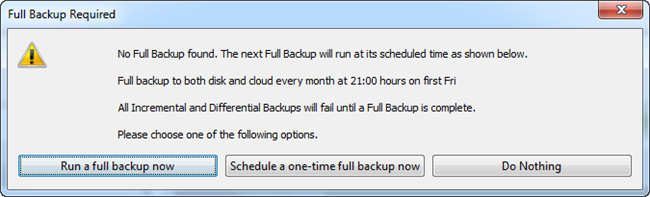
After saving your backup set, a pop-up window will appear with the options to run a full backup immediately, schedule one for later or do nothing.
After making your selection, another pop-up window will prompt you to configure your email server in order to start receiving email notifications about the status of your backup. Clicking Yes, configure a mail server will open up an Email Settings window for configuring your mail server. Clicking Not now will close the window.
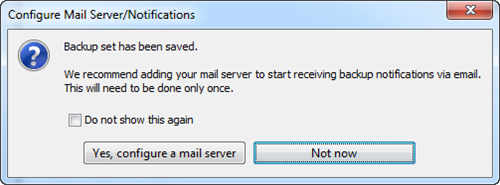
Note: If you do not want to see this message again, place a check mark in the box next to Do not show this again.
Once a backup set has been configured and saved, the name of the What would you like to back up? section changes to Backing up.
From the Backup page, you will be able to set the following options:
- Set your backup location
- Edit your backup schedule
- Edit your retention settings
- Edit your advanced backup settings
- Edit your email notification preferences

Click image to enlarge
From the Backup page, you can also perform the following actions within the toolbar at the top right of each backup set:
- Perform a backup by clicking the icon for Backup Now.
- Copy a backup set by clicking the icon for Copy Backup Set.
- Validate a backup set by clicking the icon for Validate Backup Set.
- Delete a backup set by clicking the icon for Delete Backup Set.
- Disable and enable a backup set by sliding the icon for disabling and enabling a backup set.
Carbonite Safe Server Backup makes it easy to configure backup sets by grouping the configuration options as follows:
- What would you like to back up?
- Set your backup location
- Edit your backup schedule
- Retention settings
- Advanced backup settings
- Email notification preferences
For additional information about these menu options, please review the backup set options.
 Feedback