

Backup Set Options

Summary:
- This article is for Windows only
Backup sets are listed in the left hand pane of the Carbonite Safe Server Backup (CSSB) user interface. While on the Backup page, you can create, edit, enable, disable, validate, delete, or clone backup sets by right-clicking a backup set and choosing the desired action for that set from the pop-up menu that appears.

The same operations are also available in the File menu in the user interface.
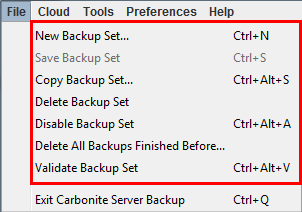
Note: The Delete All Backups Finished Before... option is only availabe from this menu.
The following options are available for a backup set:
- New Backup Set - It allows you to create a new backup set.
- Save Backup Set - It allows you to save the configuration of a backup set.
- Activate Backup Set - It allows you to activate a backup set. An activated backup set will perform all its scheduled backups and be eligible for a restore operation. By default, a backup set is in the activated state.
- Copy Backup Set - It allows you to create an exact copy of the current backup set. Schedules can be carried over to the cloned backup set at the user's discretion. A cloned backup set can be modified as necessary. Users who wish to create multiple, similar backup sets can use this feature to reduce setup time.
- Delete Backup Set - It allows you to delete a backup set. Choosing this operation will present the user with the following two options:
- Delete this backup set configuration and all associated backup data from cloud and disk. This operation may take a long time to complete!
- Just delete this backup set configuration from this computer, but retain all associated backup
- Disable Backup Set - It allows you to disable a backup set. A disabled backup set will not perform scheduled backups, but will be eligible for a restore. You can re-enable a disabled backup set at any time, and the backup set will begin honoring the scheduled backups again.
- Delete All Backups Finished Before... - It allows you to remove all backups before a specific date. This operation is most useful if you wish to delete a large number of backup runs based on age.
- Validate Backup Set - It allows you to check whether the essential configuration for the backup set is correct or not. If there are errors during the validation process, it will indicate that CSSB won't be able to use the configuration provided by the user to perform backup/restore operations correctly. Backup set configurations are automatically validated when configurations are saved as well as before any backup run is performed.
Note: Deleted backups cannot be recovered.
Solution:
The sections below are collapsed. Please click the section title to open / close a particular section.
What Would You Like to Back Up
You can choose what type of data you want to back up from the What would you like to back up? section.
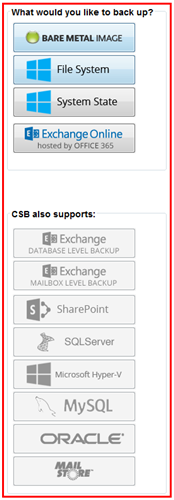
The type of data available for backup is as follows:
- Bare Metal Image - It allows for a complete backup and restore of an entire system to an alternate hardware. You can only create one Bare Metal Image backup set per Server (It is only available with certain Server plans).
- File System - Windows NTFS and ReFS file systems are supported. CSSB automatically selects files/folders in your home directory. You can also select files and folders from a browser tree.
- System State - Windows System State refers to a collection of several key operating system elements and their files. Backing up the Windows System State is crucial for a successful disaster recovery strategy. A System state backup includes Windows Boot files, System files, Internet Information Services, COM+ database, Registry, Active Directory, and Certificate Server.
- SQLServer - CSSB backs up SQL Server databases and supports SQL Server 2000, 2005, 2008, 2012, 2014 and 2016.
- SharePoint - CSSB backs up all mounted SharePoint databases and supports SharePoint 2007, 2010, 2013 and WSS 3.0.
- Standalone and single-server SharePoint farm configurations are supported.
- Multi-server SharePoint farm configurations are not supported.
- Oracle - CSSB backs up Oracle databases and supports Oracle 11i and 11g (only available in version 5.6).
- MySQL - CSSB backs up MySQL databases and supports MySQL 5.0 and above.
- Hyper-V - CSSB backs up Hyper-V hosts and hosted virtual machines on Windows Server 2008 and Windows Server 2012.
- Server core installations are not supported for Windows 2008 or 2012.
- Exchange Database - CSSB backs up Exchange server databases and supports Exchange Server 2003, 2007, 2010, 2013 and 2016.
- Exchange Mailbox - CSSB backs up Exchange local mailboxes and supports Exchange 2010, 2013 and 2016.
- Exchange hosted for Office 365 - CSSB backs up Exchange Online hosted for Office 365 mailboxes.
- MailStore Archives - CSSB backups MailStore archives.
Note: SQL Server, Exchange Server, SharePoint, and Hyper-V server configurations are automatically discovered by CSSB.
Set Your Backup Location
Carbonite Safe Server Backup provides the flexibility of backing up to the cloud, to a local disk or a combination of both.
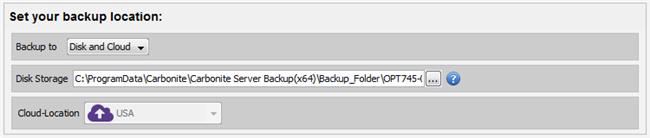
Within the Set your backup location: section, you can specify the following backup options:
- Backup to - You can backup to disk only, to cloud only or to both disk and cloud.
- Disk Storage - CSSB supports backing up to a local disk, an external hard disk or a network mapped drive.
- Cloud Location - Carbonite stores your data in secured data centers located across the world. You can choose from the United States, Canada and Europe. It is possible to have different cloud storage locations for different backup sets. However, please note that once configured, you can’t change the cloud storage location for a backup set. If data for a single backup set were uploaded to multiple locations, it will be difficult for CSSB to perform restores.
Edit your backup schedule
You can add scheduled backup runs for a backup set within the Edit your backup schedule: section.
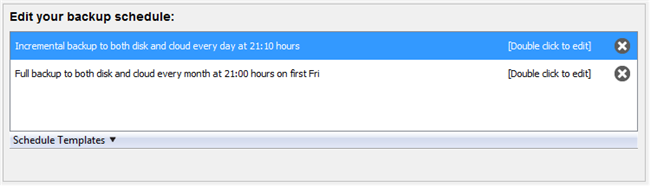
Note: A backup schedule template can be modified at any time by selecting and double clicking it.
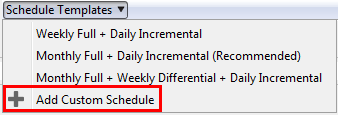
Carbonite Safe Server Backup recommends a monthly full backup and a daily incremental backup. These predefined templates can be selected when configuring a backup schedule:
- Weekly Full + Daily Incremental - It indicates a weekly full backup and a daily incremental backup to both the local disk and to the cloud.
- Monthly Full + Daily Incremental (Recommended) - It indicates a monthly full backup and a daily incremental backup to both the local disk and to the cloud.
- Monthly Full + Weekly Differential + Daily Incremental - It indicates a monthly full backup, a weekly differential backup, and a daily incremental backup to both the local disk and to the cloud.
Note: When a new backup set is created, CSSB automatically assigns the recommended Monthly Full + Daily Incremental backup schedule to that backup set.
Carbonite allows you to stack different backup types and schedule them according to your preferences. For instance, you can set a full backup to run once a month, a differential backup once per week, and an incremental backup once per day.
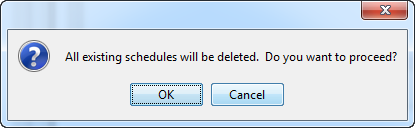
To stack backup schedules, select the Add Custom Schedule option from the Schedule Templates drop down menu.
A window will appear with a warning message. Click OK to proceed.
To add a custom schedule, click the Add Schedule button to proceed.
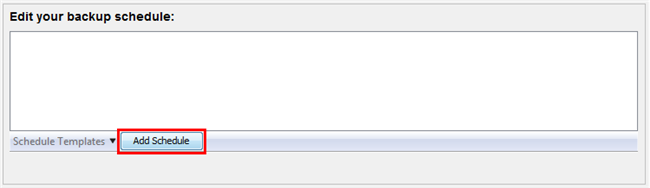
Once a schedule has been added, it will appear in the list of backup schedules.
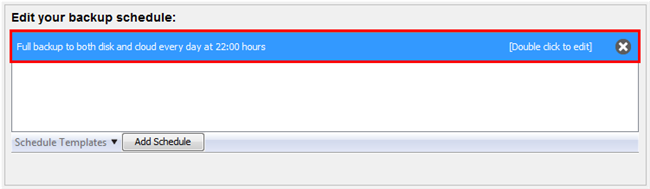
To edit a backup schedule, double click it. A window will appear with customizable options.
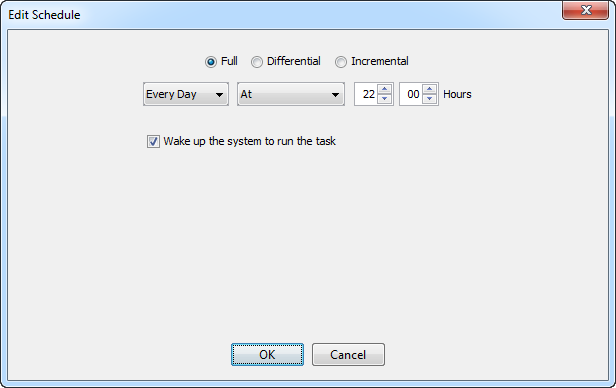
Within this screen, you can run a Full, Differential, or Incremental backup every day, every week, every month or every year at a specific time. You can also specify the following backup options:
- Full backup - This type of backup makes CSSB back up all of the data associated with the backup set.
- Differential backup - This type of backup makes CSSB back up only the data that changed since the last successful full backup.
- Incremental backup - This type of backup makes CSSB back up only the data that changed since the last successful full, differential, or incremental backup.
- Wake up the system to run the task - CSSB can also be set to wake the computer to run the backup, if it is in Sleep, Standby, or Hibernate mode. Simply mark the Wake up the system to run the task checkbox to enable this feature.
Computers running on Windows 7 and Windows 8 operating systems require that you allow wake timers in order for the Wake up the system to run the task feature to work properly. Follow the steps below:
- Click Start; Control Panel; Power Options.
- Locate your currently selected power plan and click the Change plan settings link next to it.
- Click Change advanced power settings.
- Scroll down the list of power settings. Locate and expand the Sleep section.
- Expand the Allow wake timers sub-section.
- Set any appropriate settings to Enable.
Retention Settings
Within the Retention settings: section, you can configure a separate retention policy for backups stored on disk and backups stored in the cloud.

Note: Expired backups are purged within 24 hours of expiration.
Backups are only removed by pre-defined retention policy or by manual deletion. Every backup is added to disk or the cloud without overwriting previous backups, so it is important to set a retention policy that suits your needs while also staying within your chosen storage budget.
While configuring a retention policy, consider the following:
- Importance of older backup data, to ensure that you have access to older files even if those files have been deleted or modified and are not contained in newer backup runs. Past backups also allow for recovery from viruses such as Cryptolocker, which encrypt users' data with unbreakable encryption.
- Free space on disk and/or cloud, to ensure that your backups do not fail due to lack of space.
Retention Types
There are two types of retention available after clicking the Edit button within the Retention settings: section:
- Number of Cycles: This option allows users to keep a chosen number of backup cycles. A backup cycle is a full backup plus all associated incremental and differential backups. When a new full backup is completed, excess backup cycles are purged. Please refer to our Knowledge Base article on Number of Successful Full Backups to Retain for more detailed information.
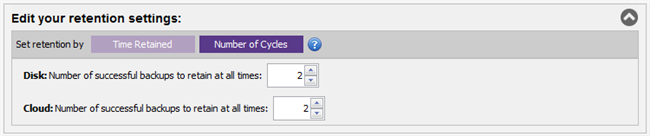
- Time Retained: This option allows users to keep backups for a specific period of time. However, a backup will not be purged if another backup depends on it. In other words, no backup in a cycle will be purged until all of the backups in that cycle are ready to be purged. This option ensures that you have all the data that is needed to perform a complete restore to any available backup point, but it does mean that backups can be kept longer than their retention setting suggests.

Retention Values
Carbonite Safe Server Backup offers two special retention values:
- Forever: Change the retention value to 0 (zero) to keep backups forever. A backup set to be kept forever will never expire. It will never be purged automatically, but it can be deleted manually. Remember that backups do not overwrite each other. Please ensure that you have ample space on disk and/or cloud if you choose to keep backups forever.
- Delete After Upload: Only available for disk backup retention, this causes the backup on disk to be deleted immediately after it is uploaded to the cloud. Only backups that have successfully uploaded will be deleted. Set your retention value to -1 to use the Delete after Upload option.
Advanced Backup Settings
Carbonite Safe Server Backup supports compression and encryption of user data. You can manage your bandwidth by specifying maximum upload and download rates to and from the cloud, and advanced users will also be able to run a custom script before or after a backup.

CSSB offers two types of encryption:
- Auto Encryption: Carbonite Safe Server Backup will automatically encrypt your backups on the cloud using AES 128-bit (or better) encryption.
- Private Key Encryption: With Private Key Encryption, users create a unique key generated from a passphrase. The encryption key or passphrase is required in order to restore data. Private Key Encryption will encrypt your backups using AES-256 bit encryption. AES 256-bit encryption is trusted worldwide.
Private Key Encryption
With Private Key Encryption, each user will create a unique key generated from a passphrase. The encryption key or passphrase is required in order to restore data.
Private Encryption Keys will decrypt your backups using AES 256-bit encryption. AES 256-bit encryption is trusted worldwide.
Creating a New Private Encryption Key
You need to first create a private encryption key. To create the key:
- Click the Edit button to the right of the Advanced backup settings panel.
- Click Add Private Key with 256-bit encryption.
- A new window will appear.
- Enter a Key Name. This will be the name of the file stored on disk.
- Choose a passphrase.
- The passphrase must be at least four characters in length.
- Confirm the passphrase.
- Choose a location to which your encryption key will be saved.
- The key must remain in this location in order to encrypt your backups.
- Click OK. A new window will appear to confirm that the encryption key was created.
- Click OK in the new window.
- Save the backup set. All future backups for this backup set, local and cloud, will be encrypted using your Private Encryption Key.
- Past backups, if they exist, are not retroactively encrypted.
Adding an Existing Private Encryption Key
You may use an already-existing Private Encryption Key with other backup sets.
- Click the Edit button to the right of the Advanced backup settings panel.
- Click Add Private Key with 256-bit encryption.
- A new window will appear and ask you if you wish to use the existing key.
- Click Enable.
- Save the backup set. All future backups for this backup set, local and cloud, will be encrypted using your Private Encryption Key.
- Past backups, if they exist, are not retroactively encrypted.
Deleting an Existing Private Encryption Key
To delete an encryption key:
- Select any backup set for which Private Key Encryption is enabled.
- Click the Edit button to the right of the Advanced backup settings panel.
- Click Delete Private Key.
- A window will appear to confirm your deletion and warn you that a copy of the key should be kept for decryption purposes.
Existing Private Encryption Keys cannot be modified. To change a key, first delete a key and create a new one.
Auto Encryption
Carbonite Safe Server Backup will automatically encrypt your backups on the cloud using AES 128-bit (or better) encryption. Transfer of your backup data to the cloud is secure using the Transport Layer Security (TLS) protocol. The encryption itself takes place server-side on the cloud.
Note: Auto Encryption only applies to backups stored on the cloud. Local backups will not be encrypted. If encryption of locally-stored backups is required, you must use the Private Key Encryption option.
Compression
Compression makes the backups smaller. A small backup can be uploaded to the cloud much faster than a large one. This can help save network bandwidth and reduce the storage space required for backups. Compression is ON by default, but it can be turned OFF within the Advanced backup settings section.
CSSB cannot accurately predict how much any given backup set will compress. Some data, such as text documents and databases, will compress very well. Other data, like most multimedia files, does not compress well.
Bandwidth Throttling
By default, CSSB attempts to transfer data to and from the cloud at the maximum possible speed. Bandwidth throttling allows users to limit the amount of bandwidth used by CSSB. Throttling can be set at a global level (affecting all backup sets), or configured for a specific backup set.
Users may select a maximum bandwidth allotment separately for upload and for download. Also, users may choose to have throttling always apply, or to only apply at certain times. All throttle speeds are in kilobits per second. A value of 0 means the speed is unlimited.
There are two options available for bandwidth throttling:
- Throttle By Speed: This option sets a maximum bandwidth allotment that is always on.

- Throttle By Time: This option allows you to throttle only at certain times and on certain days. To set Time-based throttling, click the buttons for Max Upload Rates by date and time or Max Download Rates by date and time. A time table will appear. Select the cells from the time table shown and input the desired value in the Maximum Rate (kbps) box. Click Apply Custom Rate to Selected Slots to apply the provided value to the selected slots.

For ease of use, CSSB comes with predefined templates for time-based bandwidth throttling. You can choose a template from the Choose Predefined Template dropdown. If you wish to modify the template values, you can select the time slots as described above and configure different values.
Note: Configured values take effect only for future data transfers. Any ongoing jobs will continue to use any previously configured values.
Custom Scripts
CSSB can run batch scripts before and/or after any given backup. There are strict requirements for batch scripts used in this manner. Please refer to our Knowledge Base article on How to Use Batch Scripts with CSSB for more detailed information.

Email Notification Preferences
Advanced users will be able to configure email notifications when an operation completes by clicking the Edit button to the right of the Email notification preferences panel. Once configured, email notifications are enabled for all backup sets.
By default, emails are sent only when an operation has failed. Emails can also be sent after a success or a warning. Email notifications will not be sent upon success or failure of any restore of the Bare Metal Image backup type. Emails can be sent for all other operations in the Bare Metal Image backup type.

Note: Emails will not be sent until the SMTP server is configured.
Just Delete this Backup Set Configuration From this Computer, but Retain All Associated Backup
Selecting this operation will remove the backup set from CSSB, but all data will be left intact on both local disk and the cloud.
Note: The backup set can be recovered by Importing Existing Backup Sets.
 Feedback