

Restoring a Microsoft Exchange Server Database

- This article is for Windows only
Summary:
Carbonite Safe Server Backup (CSSB) supports the restore of Microsoft Exchange databases to the same server or to an alternate server. Three types of recovery operations are allowed by Microsoft Exchange:
- Roll-forward - This recovery method is used when databases in the storage group are lost, but the transaction log files are intact.
- Point-in-time - This recovery method is used when only transaction log files are lost, or when both transaction log files and database files are lost.
- Full restore - This recovery method is used when the whole storage group (databases and log files) must be restored from a full backup.
The state of the Microsoft Exchange Server when the restore is started determines what type of recovery will be available. Please see this Microsoft article for more details on Exchange recoveries.
All Exchange versions support restores to the original location. In addition, you can restore Exchange 2007 backups to a Recovery Storage Group and Exchange 2010 or 2013 backups to a Recovery Database.
If you wish to restore an individual mailbox, please refer to Recovering a Deleted Mailbox or Mailbox Item(s).
All Restore Requirements must be met before starting the restore. Microsoft Exchange Server restores have many additional requirements. Some requirements will change depending on the version of Exchange you are using.
Solution:
Restore Requirements
The following requirements must be met, whether restoring to the original computer or to an alternate computer:
- The amandabackup / CarboniteUser user must have full access to the folder where the backups are stored.
- For cloud backups, this is the chosen Download Folder.
- For local backups, this is the folder where the backups are stored on the local disk.
- If the backups are stored in a network location, amandabackup / CarboniteUser must have access to the network folder. Please refer to How to Use External or Mapped Network Drives with CSSB.
- Likewise, the amandabackup / CarboniteUser user must have full access to the folder(s) to which the backups are being restored.
Restore Requirements for all Exchange Restores
- The Microsoft Exchange Replication service must be started for Exchange 2010 and higher.
- The Exchange Server must be installed and running on the system.
- The following frameworks must be installed for all versions of Exchange, except for Exchange 2003:
- .NET 4.0 or higher
- Powershell 2.0 or higher
Additional Restore Requirements for Restoring to an Alternate Server
- The Exchange version and service packs on the alternate server must be the same as the original server.
- Exchange must be installed and must have the same Organization and Administrative Group name as the original server.
- The storage groups and databases must already exist on the alternate server, and have the same names as the original storage groups or databases.
- Since you are restoring to an alternate recovery server that has a different set of log files, the signatures on the log files must match.
- To ensure this, either rename the E0x.log file located in the Transaction log directory, or enable the Do not mount the database option while creating a Mailbox or Public folder store.
- The Volume Shadow Copy Service must be enabled.
- The Exchange VSS Writer must be stable.
- Run the command vssadmin list writers at the Windows command prompt and check that the state of the Exchange writer is stable.
- If it is not in a Stable state, restart the Microsoft Exchange Information Store Service.
Additional Restore Requirements for Selective Restores in Exchange 2003 and 2007
It is possible to selectively restore individual Public Folder Databases and Mailbox Databases in Exchange 2003 and 2007, but there are further requirements that must be met.
- The selective restore of Public Folder Databases and Mailbox Databases can only be performed to the original location for Exchange 2003.
- The selective restore to the original location or a Recovery Storage Group is possible for Exchange 2007.
- The Database Files and the associated Logs must be selected on the Restore page. They will be listed separately. You must select both.
- The Delete existing transaction logs before running the restore method, discussed in the Restore to Original location section, is not allowed for selective restores to the original location in Exchange 2003 or 2007.
- A No Loss Restore - Do not delete existing transaction logs restore, discussed in the Restore to Original location section, will be performed for all selective restores even if Delete existing transaction logs is selected.
Restore Locations
Microsoft Exchange Server has unique options that take the place of the common restore options for most other backup types. Please choose the scenario that best fits your situation:
Each restore location may have additional requirements beyond those discussed above. Each restore location option is designed for a specific purpose.
The sections below are collapsed. Please click the section title to open / close a particular section.
Restoring to the Original Location
If chosen, this method will restore the selected database(s) to their original location. Restoring to the original location is most frequently used to fix a corrupted Exchange database or resolve issues with missing or damaged transaction logs.
Additional Requirements
- All Restore Requirements must be met, as must all Exchange-specific requirements.
- Any database that is to be restored must be in the Dismounted state.
- All Mailbox Databases and Public Folder Databases within the target Storage Group must meet this requirement, even if you are only restoring a single database.
- If one or more databases selected for restore are mounted, the restore will fail with the error vss initialization failed.
- All Mailbox Databases and Public Folder Databases within the target Storage Group must meet this requirement, even if you are only restoring a single database.
- The This database can be overwritten by restore option must be enabled through the Exchange System Manager (Exchange 2003) or Exchange Management Console (Exchange 2007 and higher).
Restore Method
You will be presented with the following two options when restoring to the original location:
Do Not Delete Existing Transaction Logs
- The existing transaction logs will not be deleted during the restore. Once the restore is complete, Exchange will perform a roll-forward recovery if all sequential transaction logs are found.
- Since Public Folder Databases participate in replication by design, the No Loss Restore - Do not delete existing transaction logs method is not supported for any restores that include Public Folder Databases. The Delete existing transaction logs before running the restore method must be chosen.
Delete Existing Transaction Logs Before Running the Restore
- It is a Point-in-time recovery method.
- All transaction logs that are currently present in the Log directory of the Storage Group(s), to which restored Mailbox Database(s), Public Folder Database(s), and/or Storage Group(s) belong, will be deleted at the beginning of the restore process.
Follow these steps to restore an Exchange server data to its original location:
- Navigate to the Restore page in the CSSB user interface, and select the backup run and point in time you want to restore.
- Select the Mailbox Store Database or Public Folder Database and its associated log files from the File List view.
- Select Restore to Original Location from the Restore Location drop down menu.
- Select Overwrite Original from the Name Conflict Settings drop down menu.
- After reviewing your selections, click Start My Restore to start the restore process.
Restoring to an Alternate Server
When chosen, this option will restore the Exchange databases to a different Exchange server. Restoring to an alternate Exchange server is an option selected usually when the original server is no longer available.
To restore an Exchange server data to an alternate server:
- Navigate to the Restore page in the CSSB user interface. Select the backup run and point in time you want to restore.
- Select the Mailbox Store Database or Public Folder Database and its associated log files from the File List view.
- Select Restore to Alternate Exchange Server from the Restore Location drop down menu.
- Select Overwrite Existing from the Name Conflict Settings drop down menu.
- After reviewing your selections, click Start My Restore to start the restore process.
Restoring to a Recovery Storage Group/Database
Microsoft Exchange server allows recovery to a Recovery Storage Group in Exchange 2007, and to a Recovery Database in Exchange 2010 and 2013. Recovery Storage Groups/Databases allow users to restore the Mailbox store to a production Exchange Server without dismounting the existing Mailbox stores.
Only Exchange 2007 and above will support Recovery Storage Groups/Databases.
Additional Requirements
All Restore Requirements must be met, as must any Exchange-specific requirements. There are also additional requirements that must be met when restoring to a Recovery Storage Group/Database.
- The Recovery Storage Group or Recovery Database must be created before the CSSB restore begins.
- Use the Exchange Management Tool or the Exchange Management Shell to create the Recovery Storage Group/Database.
- All of the recovery databases in the Recovery Storage Group must be dismounted.
- All of the recovery databases must have the This database can be overwritten by restore option enabled.
- The Recovery Storage Group or Recovery Database folder must be empty.
- If you are restoring to a Recovery Storage Group/Database on an alternate machine.
- The name of the alternate server must exactly match the name of the original server.
- The recovery server must have the same Organization name, same Storage Group name, and same Mailbox Database name as the original server.
To restore an Exchange server data to a Recovery Storage Group/Database:
- Navigate to the Restore page in the CSSB user interface. Select the backup run and point in time you want to restore.
- Select the Mailbox Store Database or Storage Group and its associated log files from the File List view.
- Select Restore to Recovery Database from the Restore Location drop down menu.
- For Exchange 2007 - Enter the name of the Recovery Storage Group.
- For Exchange 2010 and 2013 - Enter the name of the Recovery Database.
- After reviewing your selections, click Start My Restore to start the restore process.
Recovering a Deleted Mailbox or Mailbox Item(s)
Carbonite Safe Server Backup does not directly support the restore of individual mailboxes or messages. However, it is possible to use CSSB in conjunction with native Exchange tools to restore individual mailboxes or items.
Please choose your version of Microsoft Exchange from the list below:
Restoring to a Different Computer
You can restore your backed up data originating from one computer to a different computer. This method is mostly used to create a clone of the original system. It is recommended that you install the same Windows Operating System (with the same service packs) on the restore computer as was installed on the original computer. This procedure requires some additional steps before you can launch the actual restore process. The steps are as follows:
The sections below are collapsed. Please click the section title to open / close a particular section.
For complete instructions on Installing Carbonite Safe Server Backup and Importing the Cloud Certificate, please refer to the knowledge base articles linked below:
Importing Existing Backup Sets
To import existing backup sets, follow the steps below:
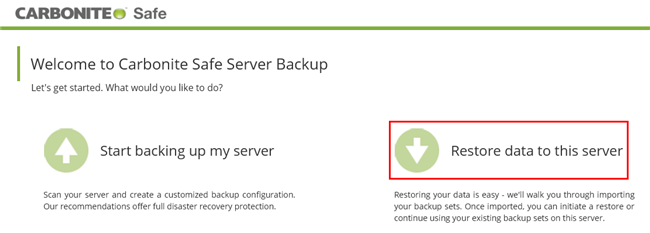
- Launch the CSSB Enhanced Interface. If an option to Restore data to this server exists, proceed to step 3. If no such option exists, proceed to the next step.
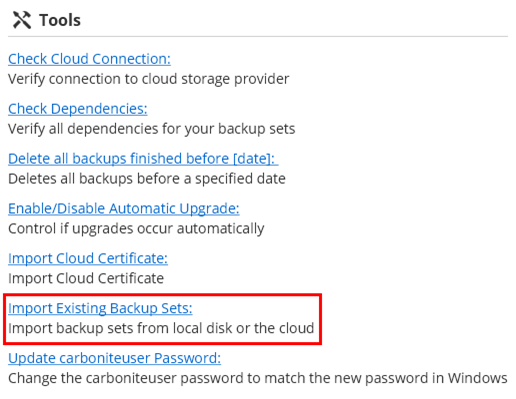
- Navigate to the Advanced page, and within the Tools section click the Import Existing Backup Sets link.
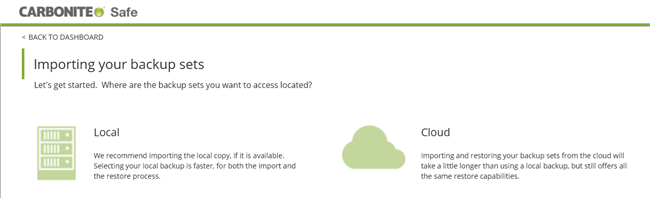
- On the next screen that appears, you will have the option of selecting a local copy of your backup set or a copy in the cloud for import.
- After making your selection, enter information about the backups you wish to recover and click Import Backup Set.
- CSSB will scan for valid backups using the information you have provided. This process can take a long time to complete.
- When prompted, close and restart the CSSB Enhanced Interface to complete the Import Existing Backup Sets process.
- All functions, including reports and data restores, will be available for the backups and backup sets.
For additional information about importing existing backup sets, please view this Knowledge Base article.
Once the backup sets have been successfully imported by CSSB, you can follow the normal restoration steps outlined in Restoring the Backup Data.
Restoring the Backup Data
Once the backup sets have been successfully imported by CSSB, you can follow the normal restoration steps to restore a Microsoft Exchange server Database.
 Feedback