

Restoring a MailStore Archive

- This article is for Windows only
Summary:
MailStore archives can be restored to any system, even one where MailStore is not installed. However, a valid MailStore installation is required in order to access and manage the restored MailStore archives.
CSSB will restore the MailStore archives to the chosen location on disk. Once restore is complete, the MailStore archives can be managed via the MailStore application.
Solution:
Restore Requirements
The following requirements must be met, whether restoring to the original computer or to an alternate computer:
- The amandabackup / CarboniteUser user must have full access to the folder where the backups are stored.
- For cloud backups, this is the chosen Download Folder.
- For local backups, this is the folder where the backups are stored on the local disk.
- If the backups are stored in a network location, amandabackup / CarboniteUser must have access to the network folder. Please refer to How to Use External or Mapped Network Drives with CSSB.
- Likewise, the amandabackup / CarboniteUser user must have full access to the folder(s) to which the backups are being restored.
Additional Restore Requirements
The following additional requirements must be met for MailStore Archives:
- MailStore archives cannot be restored to a folder where another MailStore archive exists. Please restore MailStore archives to an empty folder.
- MailStore archives can be restored to any system, even one where MailStore is not installed.
MailStore archives cannot be restored to their Original Location. An alternate location must be specified.
Restoring to the Original Computer
If OpenText Server Backup is already installed on your computer, you can open the user interface and begin restoring your MailStore archives to your computer.
Restoring the Backup Data
To restore a MailStore archive, please follow the steps below:
- Navigate to the Restore page.
- Select the backup set which contains the backup of the archive.
- You will be presented with two options:
- All items in this backup set - Choosing this option will restore all items from the selected backup set.
- Select items in this backup set - Choosing this option will allow you to browse for items to restore.
- After making your selection, click Continue to proceed.
- From the Choose your restore options drop-down menu, select Alternate Location.
- Select a valid restore and download location.
- From the What if there is a naming conflict during the restore? drop-down menu, select Overwrite Existing File.
- After confirming your settings, click Continue.
- Click Start My Restore to start the restore process.
Restoring to a Different Computer
You can restore your backed up archives originating from one computer to a different computer. This method is mostly used to create a clone of the original system. It is recommended that you install the same Windows Operating System (with the same service packs) on the restore computer as was installed on the original computer. This procedure requires some additional steps before you can launch the actual restore process. The steps are as follows:
The sections below are collapsed. Please click the section title to open / close a particular section.
For complete instructions on Installing Carbonite Safe Server Backup and Importing the Cloud Certificate, please refer to the knowledge base articles linked below:
To import existing backup sets, follow the steps below:
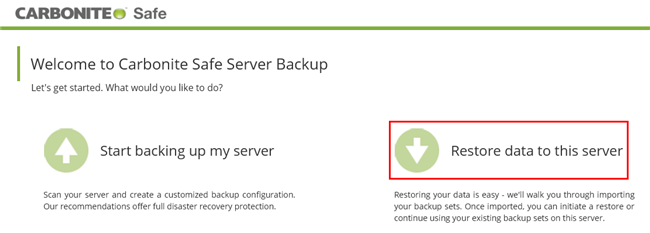
- Launch the CSSB Enhanced Interface. If an option to Restore data to this server exists, click it and proceed to step 3. If no such option exists, proceed to the next step.
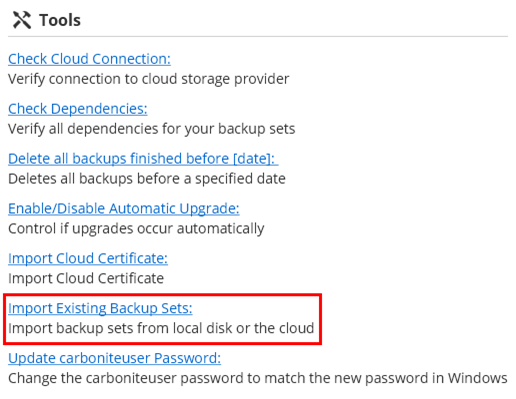
- Navigate to the Advanced page, and within the Tools section click the Import Existing Backup Sets link.
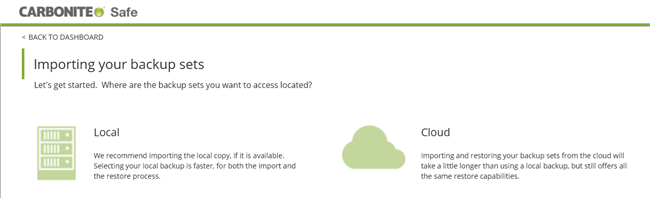
- On the next screen that appears, you will have the option of selecting a local copy of your backup set or a copy in the cloud for import.
- After making your selection, enter information about the backups you wish to recover and click Import Backup Set.
- CSSB will scan for valid backups using the information you have provided. This process can take a long time to complete.
- When prompted, close and restart the CSSB Enhanced Interface to complete the Import Existing Backup Sets process.
- All functions, including reports and data restores, will be available for the backups and backup sets.
For additional information about importing existing backup sets, please view this Knowledge Base article.
Once the backup sets have been successfully imported by CSSB, you can follow the normal restoration steps outlined in Restoring the Backup Data.
 Feedback