

Deploying Carbonite via Remote Management System

- This article is for Windows only
Summary:
You can use a remote management system, such as Labtech or Kaseya, to deploy Carbonite on your network.
Solution:
We have assistance available for the following remote management systems:
Deploying Carbonite with Kaseya
This article assumes that you have previously deployed software on your network. It is meant as a tool to assist you in deploying Carbonite.
Prerequisites
- Ensure you have the MSI file downloaded. If you haven't already, please use the these instructions to download the Carbonite Installer.
- Ensure you have the COMPANYID for your account readily available.
- Ensure you have reviewed or created any additional Backup Policies that you wish to deploy to your end users.
- Ensure that all computers you wish to deploy Carbonite to are configured to get deployments from Kaseya.
Installation Script and Variables
Within Kaseya, you should create a catalog for the Carbonite Installer.
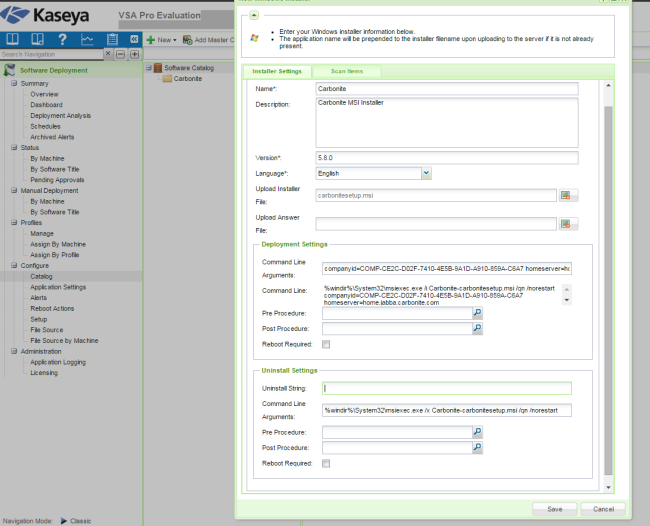
When adding the script you can use the following piece of script in conjunction with your own settings in order to deploy Carbonite to your network. Please use the explanation after to adjust your code accordingly:
MSIexec /i [LOCATION-OF-MSI-FILE] COMPANYID=[YOUR COMPANY ID FROM ACCOUNT] POLICY="[NAME OF POLICY YOU ARE DEPLOYING]" THROTTLE_INITIAL_BACKUP=[0/1] THROTTLE_KBPS=[###] /quietMSI Parameters Explanation
- COMPANYID - This is a required parameter for the code. This is a unique code found in your Carbonite Safe Pro account that will link the installed Carbonite software to your account.
- POLICY - If you have multiple policies, you can type the name of the policy within the quotation marks and the software will use that backup policy for the installation and backup. the policy can always be changed after Carbonite is installed through your Carbonite Safe Pro account. If no policy is stated, it will default to the Carbonite Default policy.
- THROTTLE_INITIAL_BACKUP=0 - Placing this optional parameter in the script will make it so that your backups are throttled at all times.
- THROTTLE_INITIAL_BACKUP=1 - Placing this optional parameter in the script will make it so that your backups are throttled for only the initial backup. After the initial backup completes, the backup speed will no longer be throttled down.
- THROTTLE_KBPS - This optional parameter should be used in conjunction with the THROTTLE_INITIAL_BACKUP options listed above. It will set the maximum backup speed in kilobytes per second for your backup.
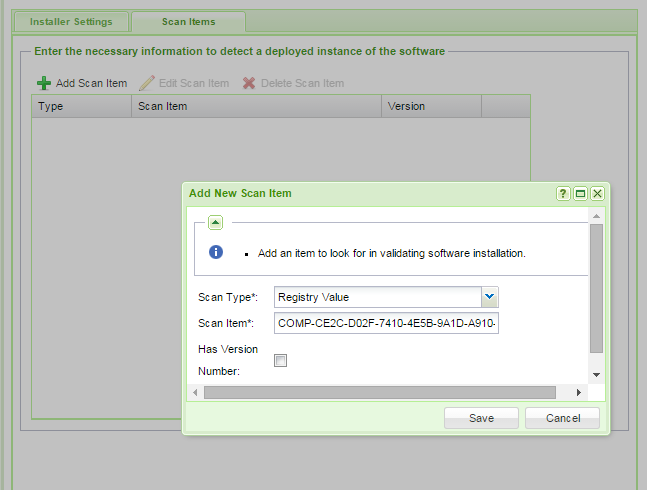
After you have created the script, you need to add a new scan item. The Scan Type should be set to Registry Value and the Scan Item should be your COMPANY ID from your Carbonite account.
You can now deploy Carbonite to your network. Once you have successfully deployed Carbonite, all of the computers will be listed under your account with all their associated policies.
Deploying Carbonite with Labtech
This article assumes that you have previously deployed software on your network. It is meant as a tool to assist you in deploying Carbonite.
Prerequisites
- Ensure you have the MSI file downloaded. If you haven't already, please use the these instructions to download the Carbonite Installer.
- Ensure you have the COMPANYID for your account readily available.
- Ensure you have reviewed or created any additional Backup Policies that you wish to deploy to your end users.
- Ensure that all computers you wish to deploy Carbonite to are able to access Labtech to receive software.
- If you are deploying to a Windows 8 computer, please review this Microsoft Support Article.
We recommend that if you are deploying multiple policies to the computers on your network that you adjust the script for each deployment to list the correct backup policy for each deployment. Additionally, you may wish to separate your computers into groups in order to easily deploy the correct backup policy
Installation Script and Variables
Within Labtech, you should create a new folder titled Carbonite under Scripts. Under the Carbonite folder, you can add a new script.
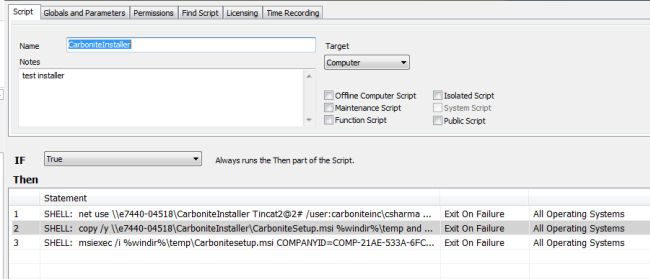
When adding the script you can use the following piece of script in conjunction with your own settings in order to deploy Carbonite to your network. Please use the explanation after to adjust your code accordingly:
SHELL: MSIexec /i [LOCATION-OF-MSI-FILE] COMPANYID=[YOUR COMPANY ID FROM ACCOUNT] POLICY="[NAME OF POLICY YOU ARE DEPLOYING]" THROTTLE_INITIAL_BACKUP=[0/1] THROTTLE_KBPS=[###] /quietMSI Parameters Explanation
- COMPANYID - This is a required parameter for the code. This is a unique code found in your Carbonite Safe Pro account that will link the installed Carbonite software to your account.
- POLICY - If you have multiple policies, you can type the name of the policy within the quotation marks and the software will use that backup policy for the installation and backup. the policy can always be changed after Carbonite is installed through your Carbonite Safe Pro account. If no policy is stated, it will default to the Carbonite Default policy.
- THROTTLE_INITIAL_BACKUP=0 - Placing this optional parameter in the script will make it so that your backups are throttled at all times.
- THROTTLE_INITIAL_BACKUP=1 - Placing this optional parameter in the script will make it so that your backups are throttled for only the initial backup. After the initial backup completes, the backup speed will no longer be throttled down.
- THROTTLE_KBPS - This optional parameter should be used in conjunction with the THROTTLE_INITIAL_BACKUP options listed above. It will set the maximum backup speed in kilobytes per second for your backup.
You can now deploy Carbonite to your network. Once you have successfully deployed Carbonite, all of the computers will be listed under your account with all their associated policies.
 Feedback