

Hibernation and Sleep Mode

Summary:
You need to configure your Windows hibernation and sleep settings so Carbonite's connection to your computer is not disrupted during a backup or restore.
Carbonite automatically changes your Windows power settings during the initial backup. These settings prevent the computer from going to sleep so Carbonite can back up your files without interruption. After the initial backup completes, Carbonite reverts these settings, and it will back up additional files as long as your computer does not enter a sleep or hibernation setting.
This article applies to:
| Carbonite Plans | Products | Platforms |
| Basic, Plus, Prime, Core, Power, and Ultimate(Not sure?) | Safe and Safe Pro (Not sure?) | Windows - View the Mac article |
Solution:
The sections below are collapsed. Please click a section title to open / close the appropriate section.
Windows 11
- Click the magnifying glass to the right of your Start Menu at the bottom of the screen and search for "Power & Battery."
- Under Sleep, set this to Never, and then press Save Changes.
Windows 10
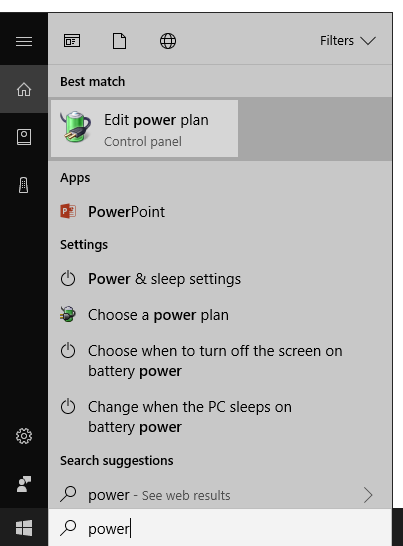
- Click the Search bar next to the Start Menu and type power.
- Click Edit power plan in the search results.
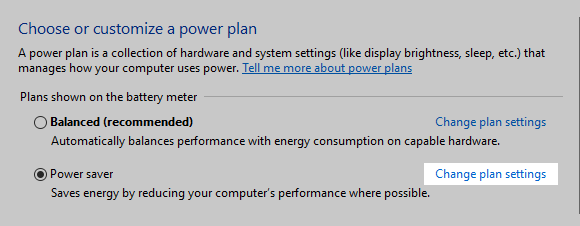
- Under Choose or customize a power plan, click Change plan settings for whichever plan you have selected.
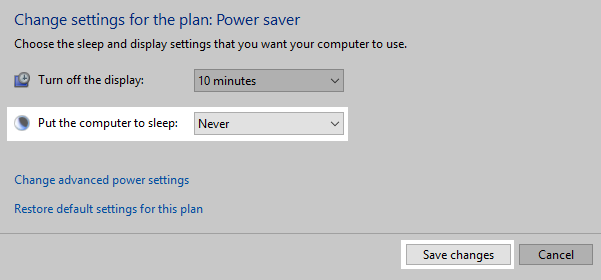
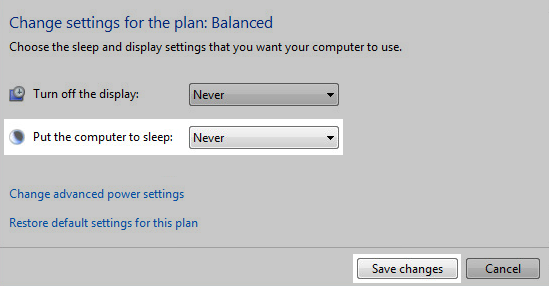
- For the setting entitled Put the computer to sleep, select Never. Once changed click Save changes and close the Control Panel.
Windows 8
- Open the Search charm by pressing the Windows key + F on your keyboard
- You can also hover your mouse over the top right corner of your computer screen until the Charm bar appears, then click the search icon.
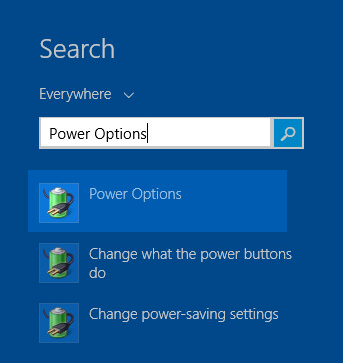
- Within the Search charm, type Power Options into the Search field and press Enter on your keyboard.
- Click Settings under the Search field and click Power Options in the results panel.
- You will see the Power Options Properties window displayed. Under Select a power plan, click Change plan settings for whichever plan is selected.
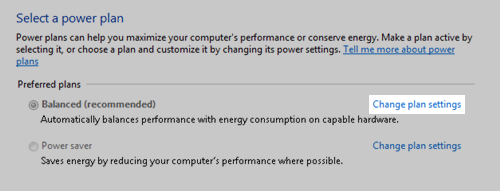
- For the setting entitled Put the computer to sleep, select Never. Once changed click Save changes and close the Control Panel.
Windows 7
- Click the Windows Start button and select Control Panel.
- Within the Control Panel, double-click Hardware and Sound.

- Click Power Options to view and edit the power settings on your computer.

- You will see the Power Options Properties window displayed.
- Under Select a power plan, click Change plan settings for whichever plan you have selected.
- For the Put the computer to sleep setting, select Never. Once changed, click Save changes and close the Control Panel.
Additional Information:
Carbonite makes the following power settings changes during the initial backup:
Put the computer to sleep = Off
- This will make it so that your computer does not go into Sleep mode when idle.
Wireless Adapter Settings = Maximum Performance
- This will help you get the most out of your wireless adapter if you are connected to the internet wirelessly.
Lid close action = Do nothing
- This will make it so that your computer doesn't shut off when you close the lid.
 Feedback