

How to Use a NAS Device with CSSB

- This article is for Windows only
Summary:
Carbonite Safe Server Backup can store your backups on any Network Attached Storage (NAS) device. CSSB can also back up data that exists on a NAS.
Some setup is required. The amandabackup / CarboniteUser user created by CSSB during installation must have access to the NAS device. The amandabackup / CarboniteUser user is integral to CSSB operations. Please refer to What is the amandabackup / CarboniteUser user for more details.
Requirements
The following requirements are necessary for a backup set to run successfully. The same requirements will also be necessary to restore.
- The amandabackup / CarboniteUser user (or the account specified by clicking the link for Verify access to network location within the Local Backup Location section) must exist on the NAS device and must have access to one or more folders. The backups will fail if the username and password used within CSSB and on the NAS device do not match.
- The shared folder(s) must be mapped within Windows and selected for backup within Carbonite Safe Server Backup. The NAS locations will not be selectable for backup unless mapped.
Solution:
Configuring a NAS Device for use with CSSB
A NAS device can be used as a local storage location for backups, files on the NAS itself can be backed up, or both. Please refer to the steps below to configure a NAS device for use with CSSB.
Note: The instructions and screenshots below will be specific to Synology NAS devices. The basic steps, however, will apply no matter what brand of NAS device is in use.
The sections below are collapsed. Please click the section title to open / close a particular section.
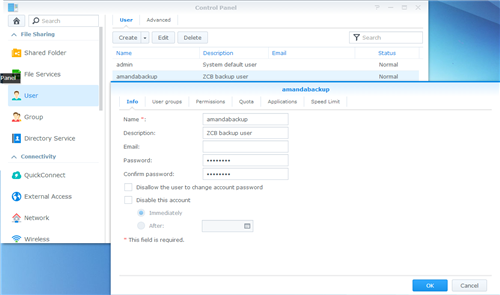
Step 1: Create the amandabackup / CarboniteUser User (or the account specified by clicking the link for Verify access to network location within the Local Backup Location section) on the NAS Device
Most NAS devices do not integrate with Windows or Active Directory. In these situations, or if the NAS device is on a different domain, amandabackup / CarboniteUser must be created as a local user where CSSB is installed and directly on the NAS device through its control panel. Alternatively, an account with access to the NAS device can be specified by clicking the Verify access to network location link within the backup set's Local Backup Location section. Please note you may not be able to create a local user on a Domain Controller or domain-joined computer where local users are disabled.
The username and password chosen for use on the NAS must be exactly the same as the username and password used by amandabackup / CarboniteUser on the machine where CSSB is installed (or the account specified by clicking the link for Verify access to network location within the Local Backup Location section).
In the Synology dashboard, users are created by navigating to Control Panel; User.
Step 2: Grant the User Account Permission to One or More Folders
Grant permissions to amandabackup / CarboniteUser (or the account specified by clicking the link for Verify access to network location) on any folder you plan to utilize for backup purposes.
The exact steps will vary by manufacturer. For some devices, you may be able to add amandabackup / CarboniteUser (or the account specified by clicking the link for Verify access to network location) to an administrators user group. On others, you must grant permissions explicitly to amandabackup / CarboniteUser (or the account specified by clicking the link for Verify access to network location).
Some devices may allow you to grant Full Control to amandabackup / CarboniteUser (or the account specified by clicking the link for Verify access to network location), and this option should be used if available. If not available, amandabackup / CarboniteUser (or the account specified by clicking the link for Verify access to network location) must have read/write permission to the folder.
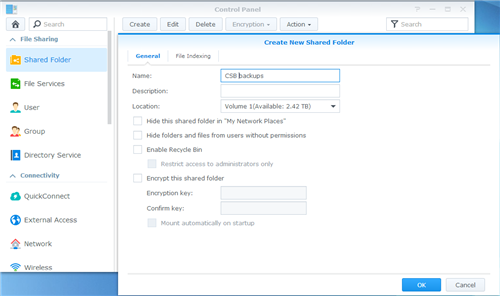
If you plan to save your backups to a folder on the NAS:
Create a new folder. This folder will be where your backups are saved.
Synology users can create new shared folders easily via Control Panel; Shared Folder.
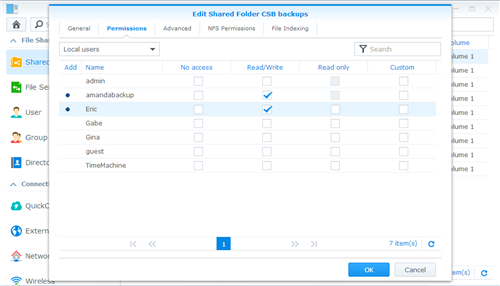
Then, grant amandabackup / CarboniteUser (or the account specified by clicking the link for Verify access to network location) permissions to that folder.
Synology users can select the new folder in Control Panel; Shared Folder, then click Edit above. The edit menu will appear. Grant permission to amandabackup / CarboniteUser (or the account specified by clicking the link for Verify access to network location) and any other users who need to access this folder. Here you can see Read/Write permissions were granted to amandabackup / CarboniteUser.
Note: Be mindful of your NAS device's Recycle Bin settings. In some cases, your device may store old backup runs after they are deleted by Carbonite Safe Server Backup. This can cause the NAS device's drives to fill up, which may cause problems with both CSSB and other applications that access the NAS. It can also cause your backups to balloon in size if the Recycle Bin is selected for backup.
If you plan to back up data that is already on the NAS:
Find the folder(s) that contain your data. Give amandabackup / CarboniteUser (or the account specified by clicking the link for Verify access to network location) read/write permission to all folders involved.
Synology users will still use Control Panel; Shared Folder.
Note: Be mindful of your NAS device's Recycle Bin settings. In some cases, your device may store old backup runs after they are deleted by Carbonite Safe Server Backup. This can cause the NAS device's drives to fill up, which may cause problems with both CSSB and other applications that access the NAS. It can also cause your backups to balloon in size if the Recycle Bin is selected for backup. This is most common with Windows File System Backups, for which backup selections can be modified to prevent Recycle Bin data from being included in backups.
Step 3: Map the Shared Folder(s) to Windows
The next step is to map the drives to Windows, so that the drives can be accessed from within the CSSB Enhanced Interface.
In Windows Server 2008 R2 and above, the Map network drive... option can be easily found by right-clicking the Network or Computer items in Windows Explorer.
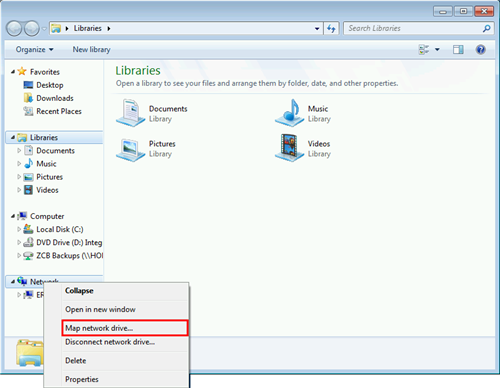
Launch the Map network drive wizard, then browse to your folder or manually input the path to your NAS.
The example Synology NAS can be found at \\HomeNAS\CSB Backups.
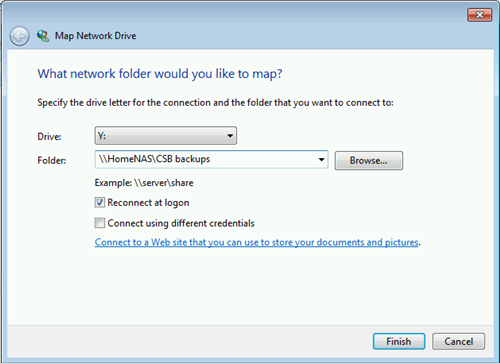
Drive mapping options can also be found at the top of Windows Explorer windows. Drives may also be mapped via other methods, such as Powershell or batch scripts. Older versions of Windows may behave differently.
Step 4: Ensure that Carbonite Safe Server Backup will be able to see your Shared Folder(s)
Whether the CSSB user interface can display your mounted NAS/Shared Folder(s) is determined by what user the interface is launching as along with their permissions to CSSB.
Option 1: Opening CSSB with Run as administrator from right-click menu
When running CSSB as admin any drives mapped by the active user will not display without following the steps below.
- Launch Regedit.exe
- Navigate to HKEY_LOCAL_MACHINE\SOFTWARE\Microsoft\Windows\CurrentVersion\Policies\System
- With System highlighted click Edit in the menu bar.
- Select New > DWORD (32-bit) Value.
- Right-click "New Value #1" and rename to EnableLinkedConnections
- Right-click EnableLinkedConnections and select Modify...
- Change Value data from 0 to 1 and click OK.
- Reboot your system when possible to apply that setting
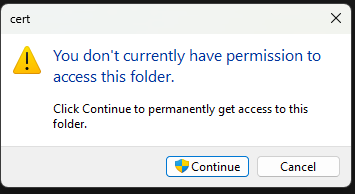
Option 2: Opening CSSB without elevation
When running CSSB without elevation the user interface will be able to show the drives mapped under the current user, but you will not be able to save the set without following the steps below.
- Close the CSSB user interface if it is open
- One by one, navigate to the folders noted below.
- C:\Program Files\Carbonite\Carbonite Safe Server Backup(x64)\misc
- C:\Program Files\Carbonite\Carbonite Safe Server Backup(x64)\zcb\cert
- C:\ProgramData\Carbonite\Carbonite Safe Server Backup(x64)\zcb\conf
- Special Note: If CSSB is installed to another drive the paths will be different. In addition the Programdata folder will not exist. The conf folder in that case will be in the same directory as the cert folder.
- When prompted with the warning below, simply click Continue.
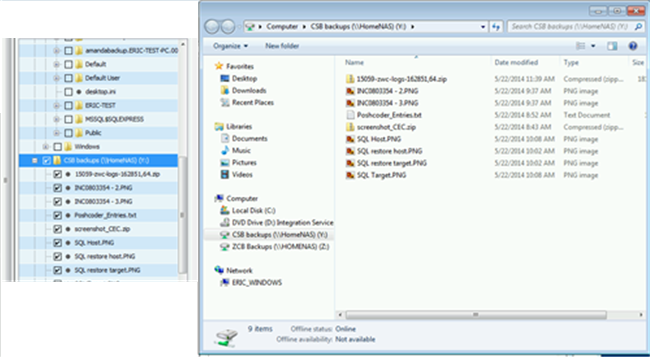
Step 5: Open Carbonite Safe Server Backup and Select Your Shared Folder(s)
Once permissions are set and the drive is mapped, the shared folders will be visible from within the CSSB Enhanced Interface.
You may now select the folder for backup, use the folder as a storage location for local backups, or both.
In this example, we have placed some files in the shared folder on the NAS. You can see the files in both Windows Explorer and in CSSB.
Step 6: Start Your Backups
Simply save your backup set. Backups will begin automatically according to your chosen schedules. You can also click Backup Now (within the Backup Details page) to begin an immediate backup.
 Feedback