Manually Uninstalling Carbonite Safe Backup Pro
- This article is for Windows - View the Mac article
Summary:
To complete the manual uninstall of Carbonite, you need to do a combination of rebooting (or restarting) your computer and deleting files. This is to fully remove Carbonite from your computer in the event that you cannot uninstall through the control panel.
Solution:
The sections below are collapsed. Please click a section title to open / close the appropriate section.
I have a 32-bit operating system
Manually Uninstalling Carbonite from a 32-bit Operating System
Manually uninstalling Carbonite from a computer with a 32-bit operating system requires that you navigate to two different locations to remove Carbonite's files.
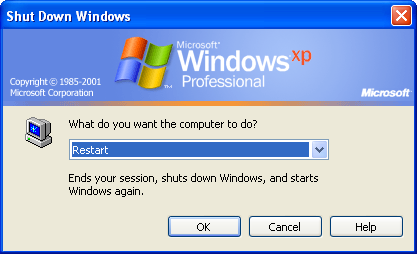
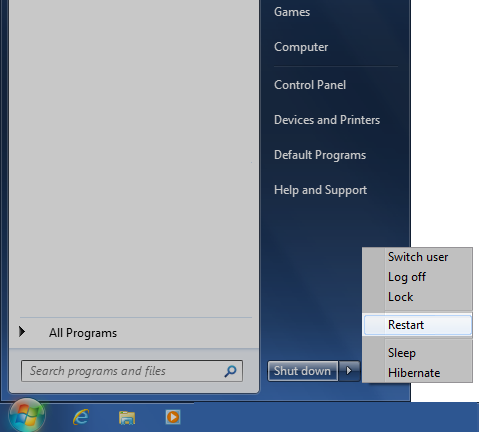
Before you begin, restart your computer from the Windows Start menu.
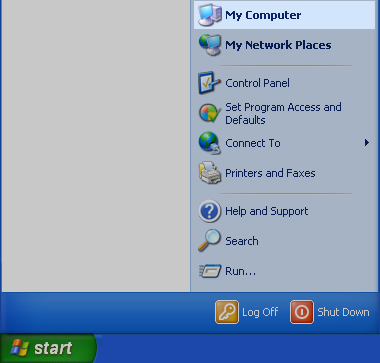
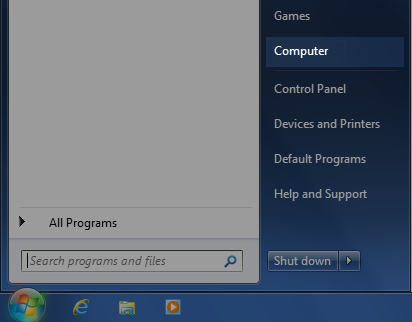
After your computer restarts, click the Windows Start button and select Computer (on Windows XP it is named My Computer).
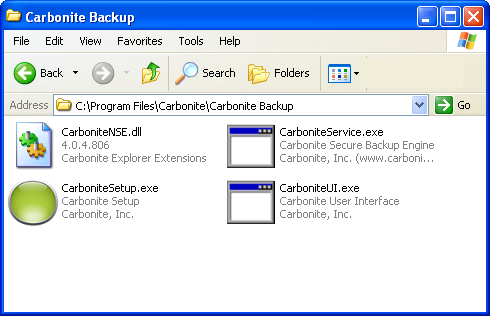
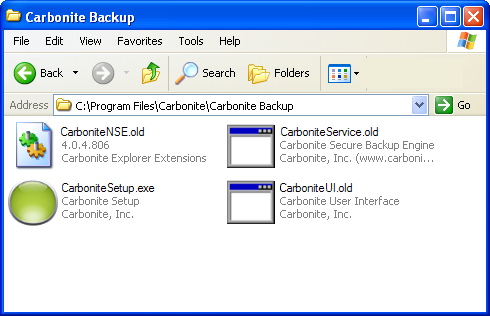
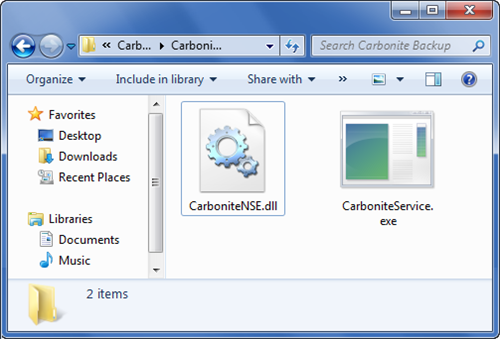
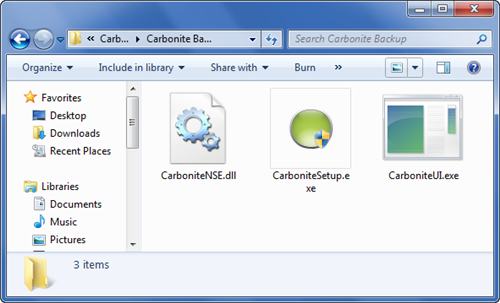
Within Windows Explorer, navigate to C:\Program Files\Carbonite\Carbonite Backup to view the files Carbonite uses to run the program.
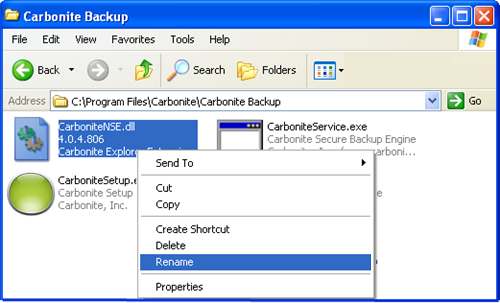
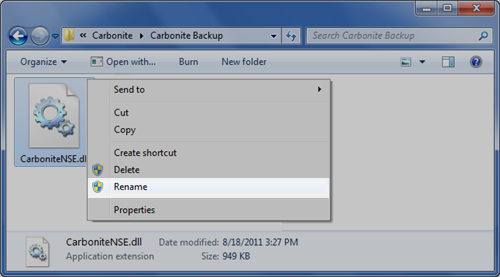
Right-click on the following files one at a time and select Rename:
- CarboniteService.exe and rename it to CarboniteService.old so you can delete it later.
- CarboniteUI.exe and rename it to CarboniteUI.old so you can delete it later.
- CarboniteNSE.dll and rename it to CarboniteNSE.old so you can delete it later.
Restart your computer again from the Windows Start menu.
Within Windows Explorer, navigate to C:\Program Files\Carbonite\Carbonite Backup to view the files Carbonite uses to run the program.
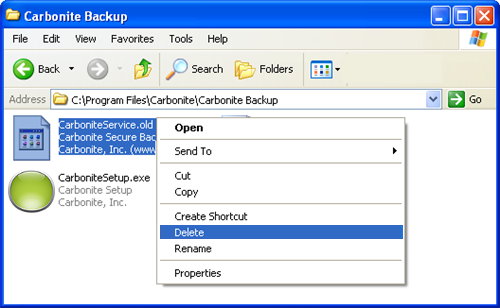
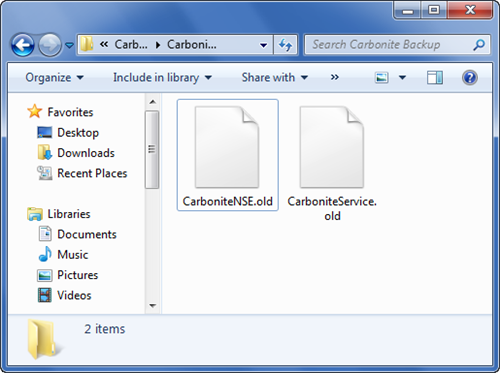
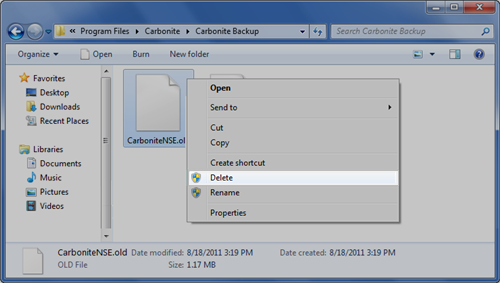
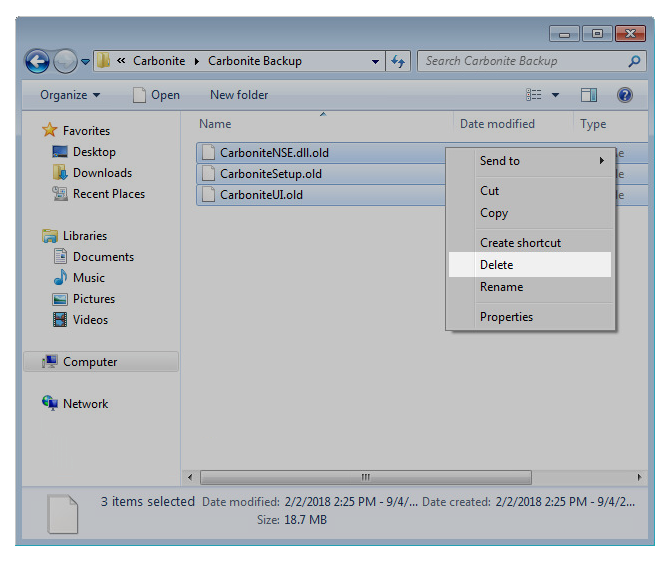
Right-click and delete the CarboniteService.old, CarboniteUI.old, and CarboniteNSE.old files from your computer.
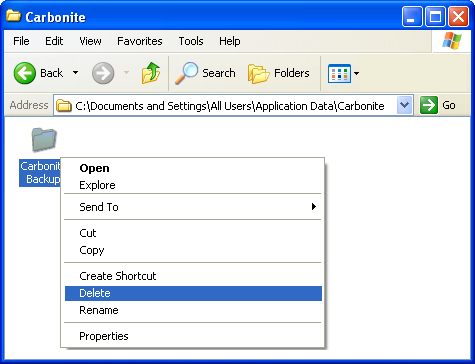
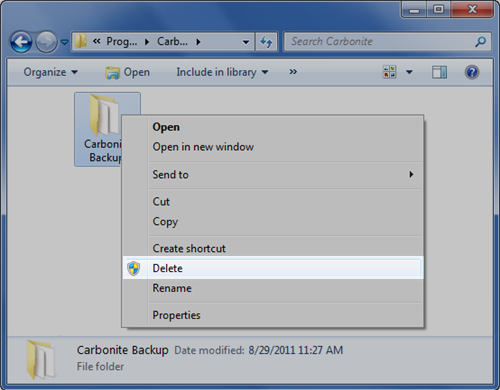
Navigate to C:\Documents and Settings\All Users\Application Data\Carbonite (C:\ProgramData\Carbonite\ in Windows Vista and Windows 7), and delete the Carbonite Backup folder.
Restart your computer one last time from the Windows Start menu.
The three reboots, while tedious, are very important in order to unload and remove the program successfully. Carbonite will now be completely uninstalled from your computer.
I have a 64-bit operating system
Manually Uninstalling Carbonite from a 64-bit Operating System
Manually uninstalling Carbonite from a computer with a 64-bit operating system requires that you navigate to three different locations to remove Carbonite's files.
Before you begin, restart your computer from the Windows Start menu.
After your computer restarts, click the Windows Start button and select Computer.
Within Windows Explorer, navigate to C:\Program Files\Carbonite\Carbonite Backup to view the files Carbonite uses to run the program.
Right-click on the following files one at a time and select Rename:
- CarboniteService.exe and rename it to CarboniteService.old so you can delete it later.
- CarboniteNSE.dll and rename it to CarboniteNSE.old so you can delete it later.
After renaming the files, navigate to C:\Program Files (x86)\Carbonite\Carbonite Backup to view the rest of the files Carbonite uses to run the program.
Right-click on the following files one at a time and select Rename:
- CarboniteUI.exe and rename it to CarboniteUI.old so you can delete it later.
- CarboniteNSE.dll and rename it to CarboniteNSE.old so you can delete it later.
Restart your computer again from the Windows Start menu.
Within Windows Explorer, navigate to C:\Program Files\Carbonite\Carbonite Backup to view the files Carbonite uses to run the program.
Right-click and delete the CarboniteService.old and CarboniteNSE.old files from your computer.
After deleting the files within the Program Files folder, please also delete the files within the C:\Program Files (x86)\Carbonite\Carbonite Backup folder.
Next, navigate to C:\ProgramData\Carbonite\ (C:\Documents and Settings\All Users\Application Data\Carbonite in Windows XP), and delete the Carbonite Backup folder.
Restart your computer one last time from the Windows Start menu.
The three reboots, while tedious, are very important in order to unload and remove the program successfully.Carbonite will now be completely uninstalled from your computer.
I have a Windows 8 operating system
Manually Uninstalling Carbonite from the Windows 8 Operating System
Manually uninstalling Windows 8 is generally the same as uninstalling from a 32-bit or 64-bit machine. However, the layouts for certain objects are different in Windows 8.
Before you can remove Carbonite's files from your machine, you must first restart your computer. You can restart your computer from the Settings charm. Hover your mouse over the top right of your screen and click Settings or press the Windows key + i on your keyboard.
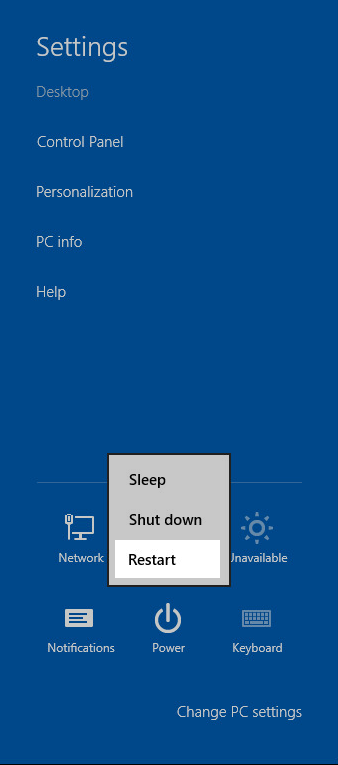
On the Settings charm, click Power; Restart to restart your computer.
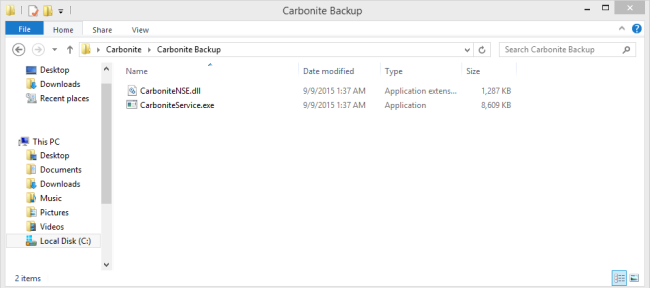
After your computer restarts, open File Explorer by clicking the File Explorer icon on the desktop or by pressing the Windows Key + E on your keyboard. Within File Explorer, navigate to C:\Program Files\Carbonite\Carbonite Backup to view the files Carbonite uses to run the program.
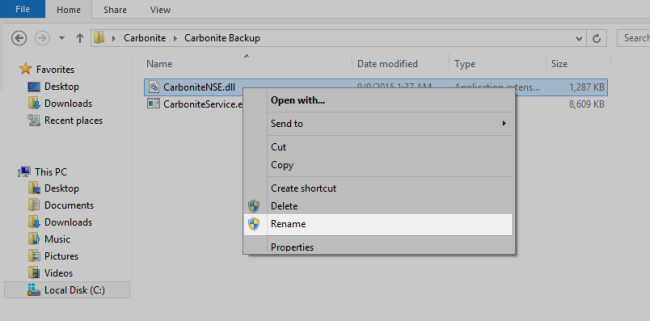
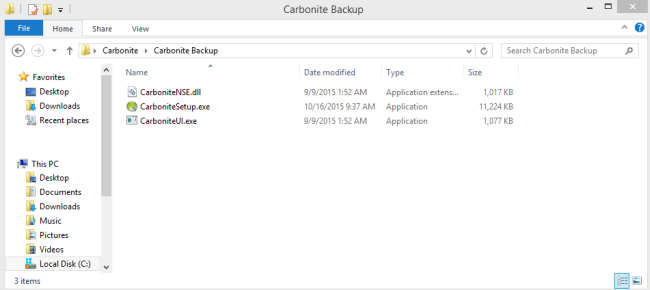
Depending on whether you are running a 32-bit or 64-bit version of the Windows 8 operating system, you will see a different number of files within this folder. Right-click on the following files one at a time and select Rename:
32-Bit Version
- CarboniteService.exe and rename it to CarboniteService.old so you can delete it later.
- CarboniteUI.exe and rename it to CarboniteUI.old so you can delete it later.
- CarboniteNSE.dll and rename it to CarboniteNSE.old so you can delete it later.
If you are running the 32-bit version of Windows 8 and have successfully renamed the files, please proceed to the next step of this process.
64-Bit Version
- CarboniteService.exe and rename it to CarboniteService.old so you can delete it later.
- CarboniteNSE.dll and rename it to CarboniteNSE.old so you can delete it later.
After renaming the files, navigate to C:\Program Files (x86)\Carbonite\Carbonite Backup to view the rest of the files Carbonite uses to run the program.
Right-click on the following files one at a time and select Rename:
- CarboniteUI.exe and rename it to CarboniteUI.old so you can delete it later.
- CarboniteNSE.dll and rename it to CarboniteNSE.old so you can delete it later.
Please restart your computer again through the Settings charm by hovering your mouse over the top right of your screen and clicking Settings or pressing the Windows Key + i on your keyboard. Within the Settings charm click Power; Restart to restart your computer.
Once your computer comes back online, open File Explorer and navigate to C:\Program Files\Carbonite\Carbonite Backup to view the files Carbonite uses to run the program. Right-click and delete the Carbonite files from your computer.
After deleting the files within the Program Files folder, please also delete the files within the C:\Program Files (x86)\Carbonite\Carbonite Backup folder if you are running the 64-bit version of Windows 8.
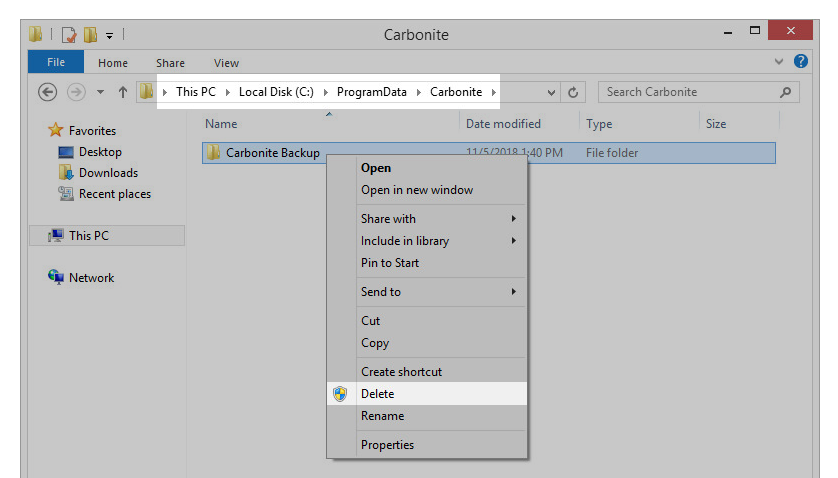
Next, navigate to C:\ProgramData\Carbonite\ and delete the Carbonite Backup folder.
Restart your computer one last time from the Settings charm by hovering your mouse over the top right of your screen and clicking Settings or pressing the Windows Key + i on your keyboard. Within the Settings charm, click Power; Restart to restart your computer.
The three reboots, while tedious, are very important in order to unload and remove the program successfully. Carbonite will now be completely uninstalled from your computer.
I have a Windows 10 operating system
Manually Uninstalling Carbonite from the Windows 10 Operating System
Manually uninstalling Windows 10 is generally the same as uninstalling from a 32-bit or 64-bit machine. However, the layouts for certain objects are different in Windows 10.
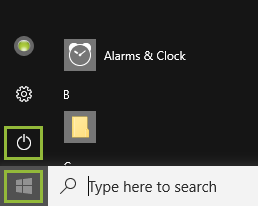
Before you can remove Carbonite's files from your machine, you must first restart your computer. You can restart your computer from the Start menu. Click the Start button (Windows icon) in the taskbar, then click Power.
A small popup menu will appear. Click Restart in the popup menu.
After your computer restarts, open File Explorer by clicking the Start button, then clicking File Explorer in the Start menu.
Within File Explorer, navigate to C:\Program Files\Carbonite\Carbonite Backup to view the files Carbonite uses to run the program.
Depending on whether you are running a 32-bit or 64-bit version of the Windows 8 operating system, you will see a different number of files within this folder. Right-click on the following files one at a time and select Rename:
32-Bit Version
- CarboniteService.exe and rename it to CarboniteService.old so you can delete it later.
- CarboniteUI.exe and rename it to CarboniteUI.old so you can delete it later.
- CarboniteNSE.dll and rename it to CarboniteNSE.old so you can delete it later.
If you are running the 32-bit version of Windows 10 and have successfully renamed the files, please proceed to the next step of this process.
64-Bit Version
- CarboniteService.exe and rename it to CarboniteService.old so you can delete it later.
- CarboniteNSE.dll and rename it to CarboniteNSE.old so you can delete it later.
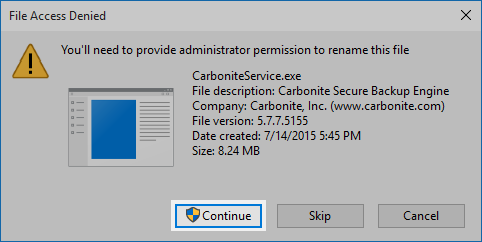
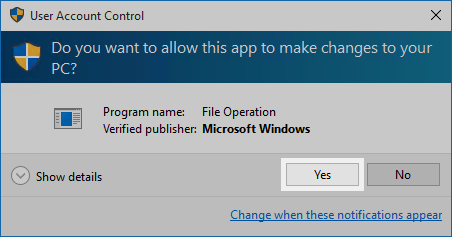
... then click Yes in the User Access Control prompt.
After renaming the files, navigate to C:\Program Files (x86)\Carbonite\Carbonite Backup to view the rest of the files Carbonite uses to run the program.
Right-click on the following files one at a time and select Rename. Accept any access control prompts as described above:
- CarboniteUI.exe and rename it to CarboniteUI.old so you can delete it later.
- CarboniteNSE.dll and rename it to CarboniteNSE.old so you can delete it later.
Restart your computer again by clicking the Start button (Windows icon) in the taskbar, then clicking Power.
A small popup menu will appear. Click Restart in the popup menu.
Once your computer comes back online, open File Explorer and navigate to C:\Program Files\Carbonite\Carbonite Backup to view the files Carbonite uses to run the program. Right-click and delete the Carbonite files from your computer.
After deleting the files within the Program Files folder, please also delete the files within the C:\Program Files (x86)\Carbonite\Carbonite Backup folder if you are running the 64-bit version of Windows 10.
Next, navigate to C:\ProgramData\Carbonite\ and delete the Carbonite Backup folder.
Restart your computer one last time from the Start menu. Click the Start button (Windows icon) in the taskbar, then click Power.
A small popup menu will appear. Click Restart in the popup menu.
The three reboots, while tedious, are very important to unload and remove the program successfully. Carbonite will now be completely uninstalled from your computer.




 Feedback