

The Report Page

- This article is for Windows only
Summary:
The Report page displays a history of all operations performed by Carbonite Safe Server Backup. Each line references a specific operation and contains many details about the operation.

Click image to enlarge
Solution:
Within the Report page, the following information is visible:
- Backup Set - Displays the name of the backup set for each operation.
- Operation - Displays all recent activities that have taken place for a Backup Set such as a Backup to Cloud, Backup to Disk, Upload to Cloud, Upload from Disk, Download or Restore.
- Start Time - Displays the start date and time (in hours, minutes and seconds) of an operation.
- Elapsed Time - Displays the amount of time (in days, hours, minutes and seconds) it has taken for an operation to complete.
- Level - Indicates whether a Full, Differential, or Incremental backup operation took place (for backup entries).
- Size - Displays the amount of data for each operation that took place.
- Retention - Displays the retention policy for each backup set associated with an operation.
- Details - Displays additional information about an operation. Will display No Error if the operation was successful.
Carbonite Safe Server Backup also displays icons next to each line in the Report page.
| Icon | Description | |
|---|---|---|
| |
A green circular icon with a white checkmark indicates the operation was successful. | |
| |
A red circular icon with an X indicates the operation failed (Refer to the Details column for more information). | |
| |
A yellow triangular icon with an exclamation mark indicates a warning (Refer to the Details column for more information). | |
| |
A gray trashcan icon with a red X indicates that the backup run has been purged. | |
| |
If a blue icon with a question mark is present in the Details column, the icon can be clicked to obtain further information. |
The sections below are collapsed. Please click the section title to open / close a particular section.
Manage Report History
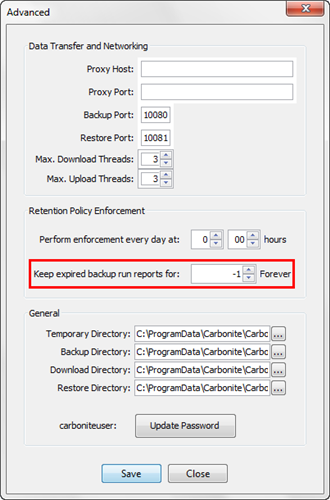
You can click on any column heading on the Report page to sort the records by that field. Columns can be rearranged in any order by clicking and dragging them horizontally. By default, the report history is kept forever. The length of the history can be customized from the Preferences; Advanced menu. Within the Retention Policy Enforcement section, you can specify the length of time you want to Keep expired backup run reports for.
Creating a Report Page Template
Carbonite Safe Server Backup allows you to customize your historical view. To create a report page template, follow these steps:
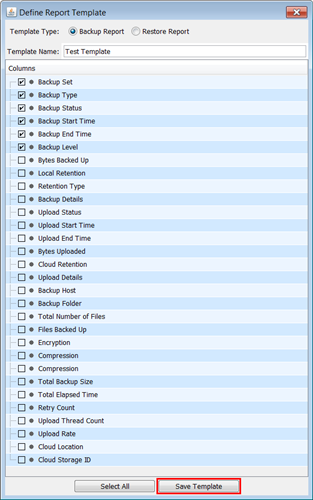
- Click the Define Template button at the bottom of the page.

- Specify a Template Type by selecting the radio button for Backup Report or Restore Report.
- In the Template Name field, type a name for your new template.
- Select the columns you want to include in the template view by placing a checkmark in the box next to their name.
- Click Save Template to add this new template.
Template Options
The Report page displays options to help manage your template(s).

The available template options are as follows:
- Define Template - It allows you to create a custom template.
- Summary Report - From its drop down menu, it will display pre-defined templates for a Backup Report and an Upload Report. Any newly created template will be visible from this menu.
- Delete Template - It allows you to delete a template you created.
- Export Report - It allows you to export your loaded template view to a Comma Separated Values (CSV) file.
The Report Page Options
Within the Report page, you are able to delete a backup run, upload data to the cloud, change your retention policy and verify the existence of backup data.

Click image to enlarge
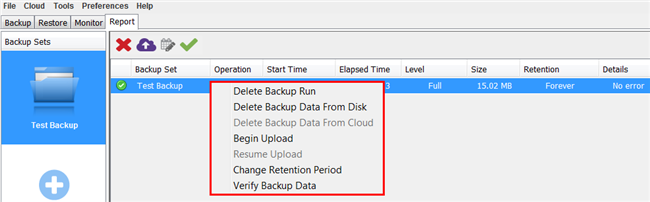
Selecting a task for a backup set will display the following menu options:
- Delete (Red X) - Based on your backup settings, you will able to perform some of the following actions: Delete Backup Run, Delete Backup Data From Disk, and Delete Backup Data From Cloud.
- Upload (Purple cloud with arrow) - The only available options are: Begin Upload and Resume Upload to the Cloud.
- Change Retention Period (Table with pencil) - This option allows you to change the retention period for the selected task.
- Verify Backup Data (Green checkmark) - This operation will verify the backup data on the local disk and in the cloud. The verification process will return a Success, Warning, or Fail status along with a brief explanation of all the failures and warnings.
Note: The Verify Backup Data operation only checks for the existence of the backup data. It doesn't check the integrity of backup data.
After selecting the task you wish to modify, right-click it to bring up a menu or click the icon at the top of the page that corresponds to the action you wish to perform.
A summary of what actions are allowed on what type of operations is provided below.
| Operation | Delete Backup Run | Delete Data from Disk | Delete Data from Cloud | Begin Upload |
|---|---|---|---|---|
| Backup to Cloud | Yes | No | Yes | No |
| Backup to Disk | Yes | Yes | No | Yes* |
| Upload from Disk | Yes | No | Yes | No |
| Download | Yes | No | No | No |
| Restore** | Yes | No | No | No |
*Available only if data from disk is not uploaded.
**Options will say Restore instead of Backup.
Note: If you select multiple tasks, the only action available is Delete Backup Run.
 Feedback