

Carbonite Errors Due to System Time Inaccuracy

Summary:
In Windows, Secure Sockets Layer (SSL) is a security protocol that is important for establishing secure connections over the internet. Many Windows services depend on SSL working properly, including Carbonite Safe software. Carbonite cannot make secure connections to your backup when SSL is malfunctioning, resulting in several different errors.
Solution:
Your system clock and time zone must be accurate for SSL to function. Your clock can be managed automatically by Windows Time Service or set manually.
Windows Time Service (Automatic)
Windows Time Service is used to manage the Network Time Protocol (NTP) on Windows.
- This protocol helps to keep your time synchronized with the coordinated Universal Time (UTC).
- If this service is disabled or broken, it may prevent many of your Windows services from running properly, including services from Carbonite solutions.
- In Carbonite Safe Server Backup, this commonly causes the following error when attempting a backup or upload operation:
Cloud communication error. Try updating your system time.
- If the time differential between the local machine and the UTC is more than a few minutes, then SSL will not function. All Carbonite Safe products depend on SSL for securely transferring data.
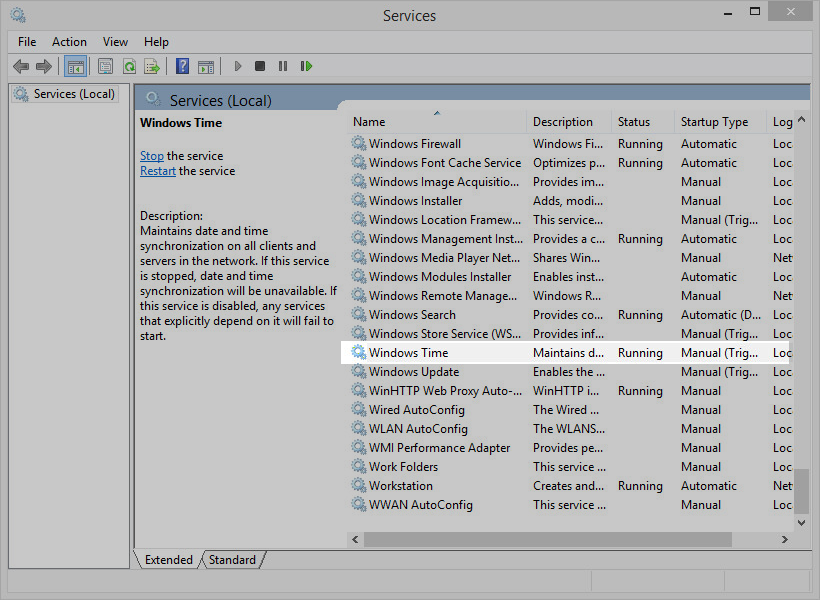
- To correct these potential issues, you must change the setting for Windows Time Service in the Services snap-in of the Microsoft Management Console:
- Open the Run dialog by pressing Windows + R.
- Type services.msc into the Run dialog and click OK to open the Services snap-in of the Microsoft Management Console.
- Scroll down the services list and double-click on Windows Time to open the service's Properties.
- In the General tab, click the Startup type dropdown and select Automatic (Delayed Start).
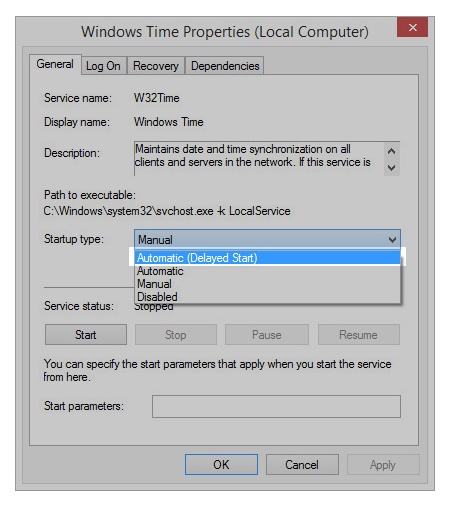
- Click Apply and OK to apply the change, then close the dialog box.
The Services snap-in can now be closed. The Windows Time configuration is complete.
If you are unable to successfully sync the service, restart your computer so the clock automatically syncs. If the sync continues to fail, you may need to manually update your system clock:
Manually Updating Your System Clock and Time Zone
When manually setting your clock, it's critical to set both the system clock and time zone accurately. If either of these is inaccurate, SSL will still fail and Carbonite will not back up.
The sections below are collapsed. Please click a section title to open / close the related instructions.
Windows XP
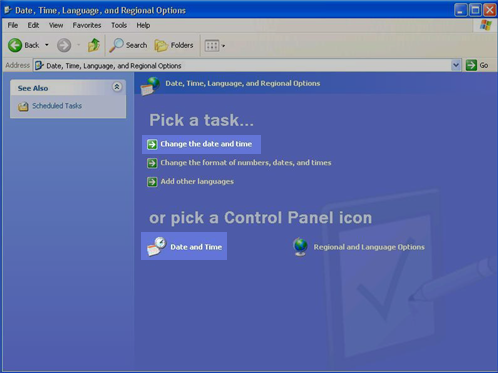
To update your system clock for Windows XP, first click the Windows Start button and select Control Panel.
Note: The instructions below are assuming that your folder structure is in Category View. (If you can see the Control Panel icons, you can find and select Date and Time in the list and skip to the next step.) You can also update your system time by clicking on the clock in the task bar.
Within the Control Panel, double click Date, Time, Language, and Regional Options.

To view and adjust your system clock, click Change the date and time within the Pick a task section, or click Date and Time within the or pick a Control Panel icon section.
You will see the Date and Time Properties window displayed. You can change the date and time settings of your system clock. When you have finished, click OK.
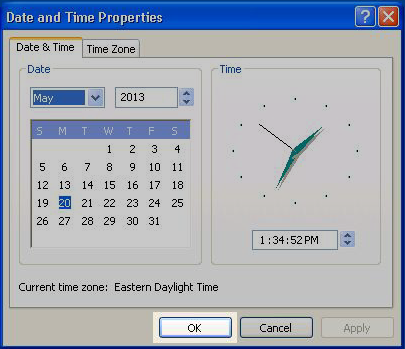
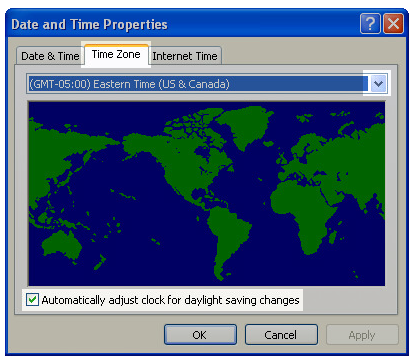
To change the time zone, click the Time Zone tab. You can select your current time zone from the drop-down list and then click OK.
Note: If your time zone observes daylight saving time and you want your computer's clock to be adjusted automatically when daylight saving time changes, make sure the Automatically adjust clock for daylight saving changes check box is selected.
Click OK to save your changes.
Windows Vista and Windows 7
To update your system clock for Windows Vista and Windows 7, first click the Windows Start button and select Control Panel.
Note: The instructions below are assuming that your folder structure is in Category View. (If you can see the Control Panel icons, you can find and select Date and Time in the list and skip to the next step.) You can also update your system time by clicking on the clock in the task bar.
Within the Control Panel, double click Clock, Language, and Region.

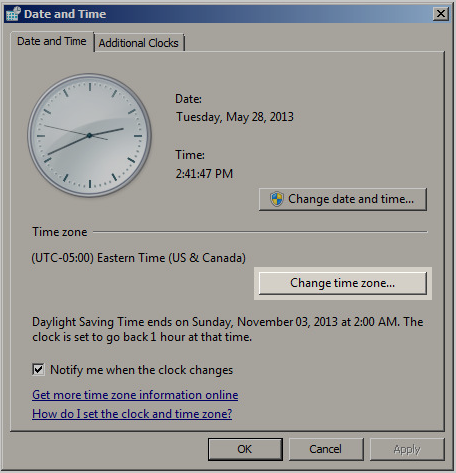
Click Date and Time to view and adjust your system clock.

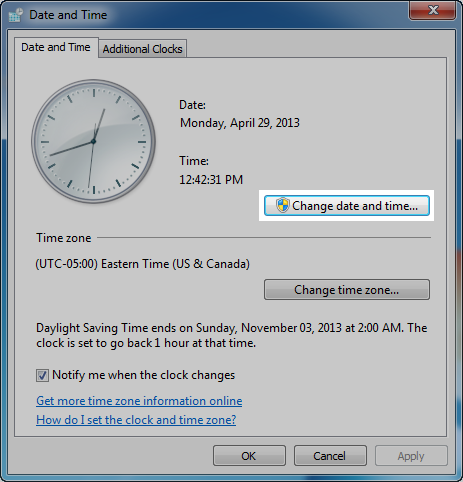
You will see the Date and Time window displayed. To update your system clock, select Change date and time....
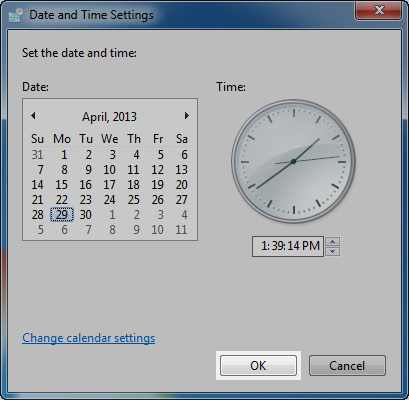
Within the Date and Time Settings window, you can change the date and time settings of your system clock. When you have finished, click OK.
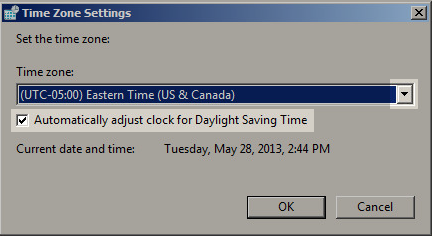
To change the time zone, click Change time zone....
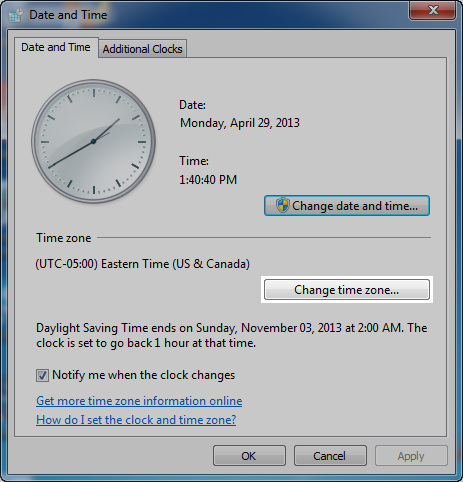
Within the Time Zone Settings window, select your current time zone from the drop-down list and then click OK.
Note: If your time zone observes daylight saving time and you want your computer's clock to be adjusted automatically when daylight saving time changes, make sure the Automatically adjust clock for Daylight Saving Time check box is selected.
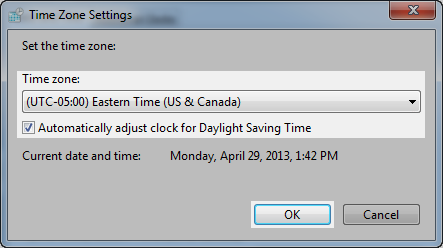
Click OK to save your changes.
Windows 8
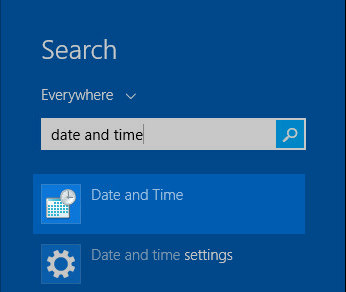
To update your system click for Windows 8, first open the Search charm by pressing the Windows key + F on your keyboard or hovering your mouse over the bottom right side of your computer screen to bring up the Charms bar and clicking Search.
Within the Search charm, type date and time into the Search field and press Enter on your keyboard. This will perform a search of your system for any files, apps, and settings relating to your search.
Click Date and Time in the results panel.
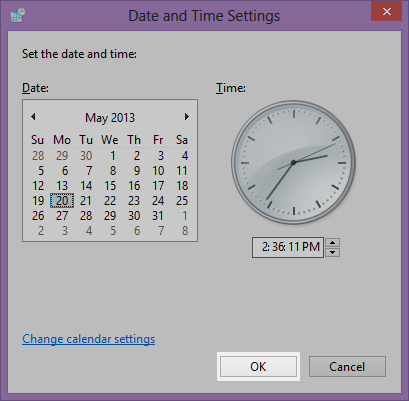
You will see the Date and Time window displayed. To update your system clock, select Change date and time....
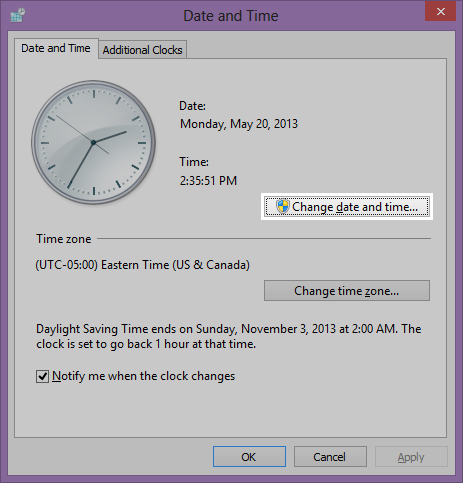
Within the Date and Time Settings window, you can change the date and time settings of your system clock. When you have finished, click OK.
To change the time zone, click Change time zone.....
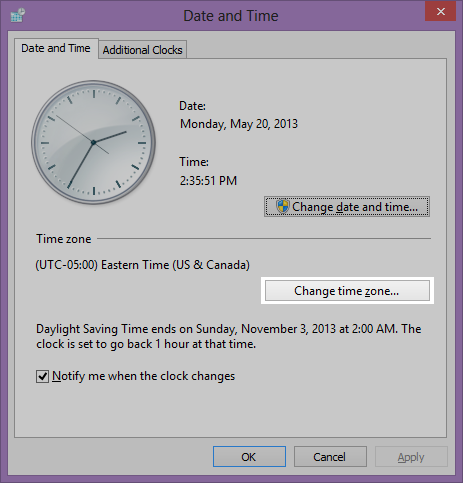
Within the Time Zone Settings window, select your current time zone from the drop-down list and then click OK.
Note: If your time zone observes daylight saving time and you want your computer's clock to be adjusted automatically when daylight saving time changes, make sure the Automatically adjust clock for Daylight Saving Time check box is selected.
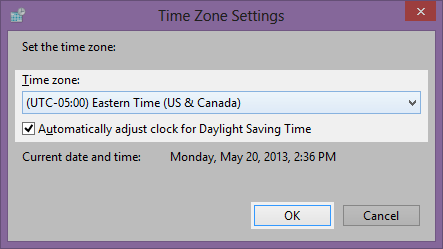
Click OK to save your changes.
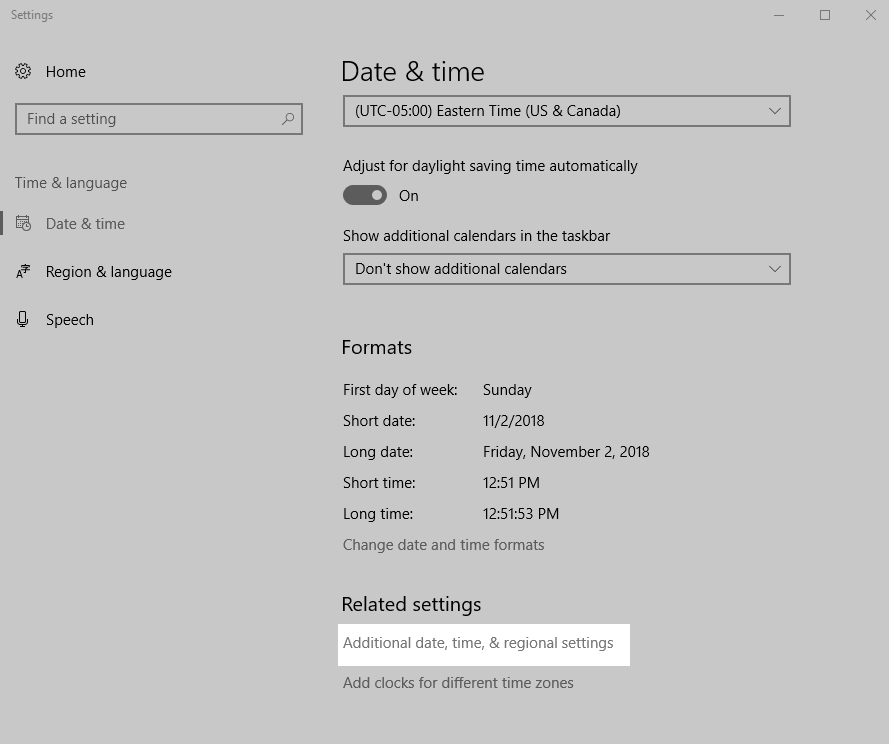
Windows 10
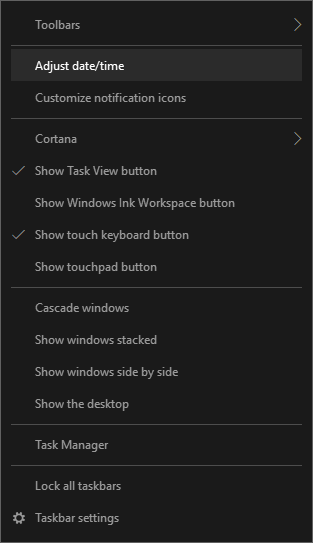
Right-click the system clock in your Windows notification area to view the date and time on the computer.

Click Adjust date/time in menu to open a new window.
In the Date & time window, verify that your time zone is accurate. You should also make sure that Adjust for daylight saving time automatically is set to On if you live in a time zone where daylight savings applies.
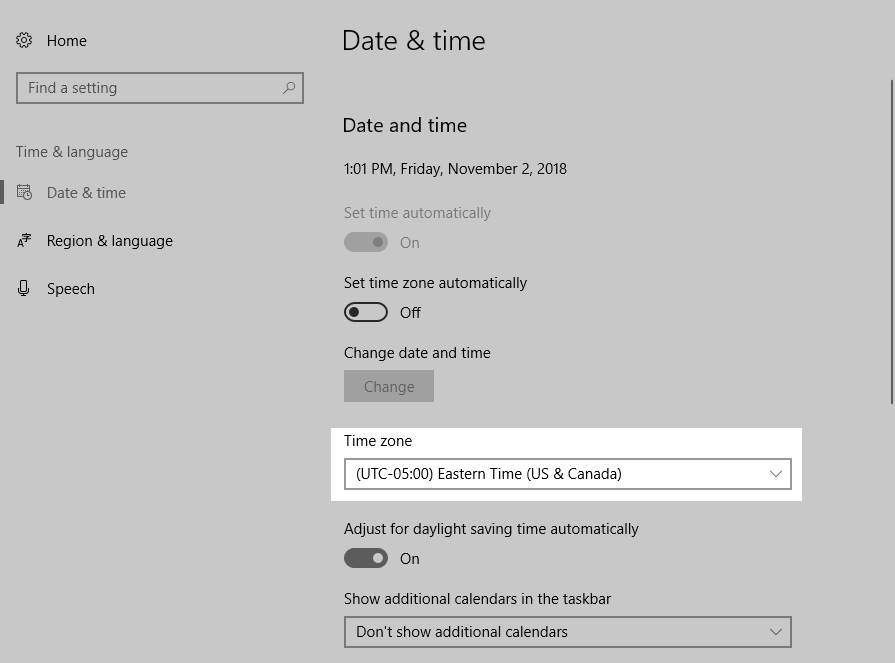
If all of these settings are accurate, scroll down and click Additional date, time & regional settings.
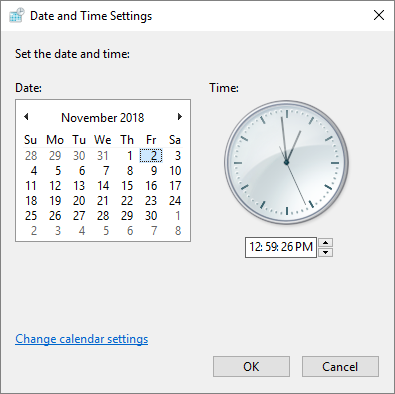
Within the control panel window, select Set the time and date.

In the Date and Time Settings window, adjust the time on your computer to the current time and click OK.
Windows Server
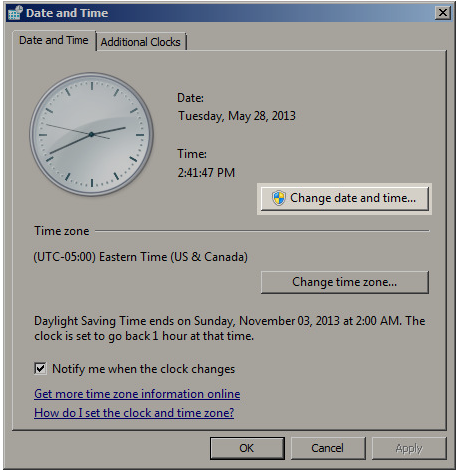
To update your system clock for Windows Server, open Windows Date and Time from the Control Panel (or by clicking the clock in the task bar) and make sure your system time is correct through one of the following methods:
- Enable the option to sync your clock with an internet time server by selecting the Internet Time tab, and click Change settings. You can also do an immediate sync by clicking the Update now button in the Internet Time Settings window. (If you do not see an Internet Time tab, skip to the next step.)
- If you do not want to use Internet Time Server, you must manually set the time. Use the World Clock to find out the correct time for your time zone.
To update your system clock, select Change date and time....
Within the Date and Time Settings window, you can change the date and time settings of your system clock. When you have finished, click OK.
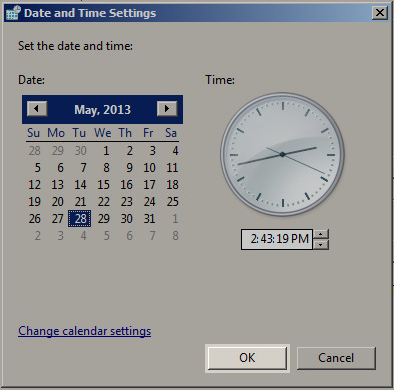
To change the time zone, click Change time zone....
Within the Time Zone Settings window, select your current time zone from the drop-down list and then click OK.
Note: If your time zone observes daylight saving time and you want your computer's clock to be adjusted automatically when daylight saving time changes, make sure the Automatically adjust clock for Daylight Saving Time check box is selected.
Click OK to save your changes.
If your clock still fails to synchronize after these instructions, a local technician may need to diagnose the issue.
Command line option
Checking, configuring, and syncing can all be done via command line for slow computers. Always carry out these steps using an elevated command prompt. Commands below are in bold.
Checking status
- sc qc w32time
- Checks on the start type
- sc query w32time
- Check the running state
Configure service, start service and sync time
- sc config w32time start=delayed-auto
- This command configures the time service to delayed start
- sc start w32time
- This starts the time service if it is not already started
- w32tm /resync
- Also run a manual time sync to ensure the sync was successful as simply starting the service does not accomplish this
 Feedback