

Managing Your Private Encryption Key for Carbonite Safe Server Backup

- This article is for Windows only
Summary:
By default, Carbonite Safe Server Backup manages your encryption key for you using Advanced Encryption Standard (AES) 128-bit (or better) encryption. In the event of a disaster recovery, you only need to remember your account username and password to access the files in your backup. If you choose to manage your private encryption key, your backups will be encrypted using AES 256-bit encryption.
Solution:
If you decide to manage your own encryption key, we highly recommend that you store at least two separate copies of the key on removable media and store at least one copy of the key in a separate physical location, such as a safe deposit box. The encryption key (or passphrase) is required in order to restore your backed up data.
While managing your key, you will be able to create and save a backup set encrypted with the private encryption key.
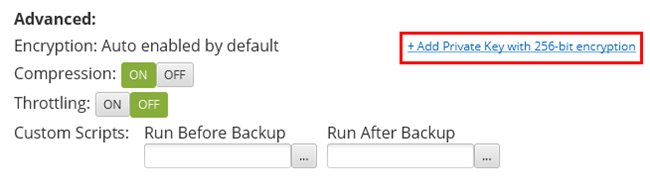
To manage your private encryption key, open the Carbonite Safe Server Backup Enhanced Interface and navigate to the Advanced section of the backup set. Click the Add Private Key with 256-bit encryption link.
An Add Private Encryption Key window will appear.
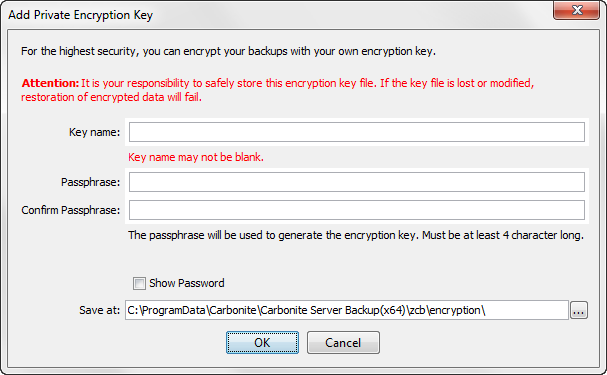
Within this window, you will be required to provide information for these fields:
- Key Name - Enter the name of the private encryption key you are creating.
- Passphrase - The passphrase will be used to generate the encryption key. It must be at least four characters in length.
- Confirm Passphrase - This is to ensure that the passphrase you have entered above is the one you would like associated with your encryption key.
- Save at - Displays the location where CSSB will save this newly created key. By default, it will be saved in CSSB's encryption folder located in C:\ProgramData\Carbonite\Carbonite Safe Server Backup(x64)\zcb\encryption\ or C:\ProgramData\Carbonite\OpenText Server Backup(x64)\zcb\encryption\. You have the option of choosing an alternate location.
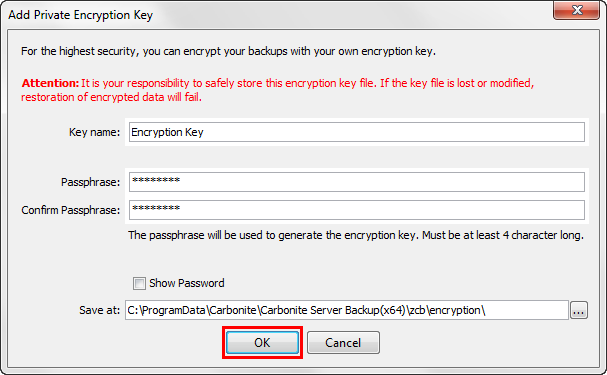
After entering all the required information, click OK to proceed.
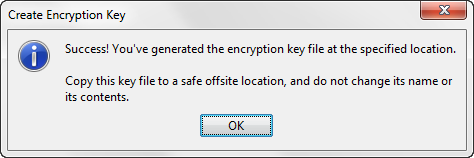
Once your encryption key has been successfully created, a window will appear. Click OK to close the window.
The newly created private encryption key will appear in the Advanced section of the backup set.

You will now be able use this private key to encrypt new backup sets.
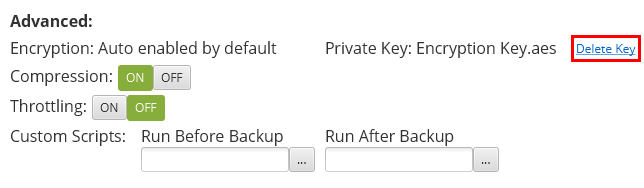
Deleting an Existing Private Encryption Key
To delete an encryption key, follow the steps below:
- Select any backup set for which Private Key Encryption is enabled.
- Within the Advanced section, click the Delete Key link next to the private key.
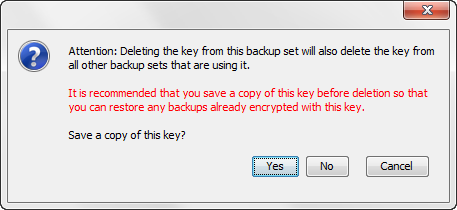
- A window will appear to confirm your deletion and warn you that a copy of the key should be kept for decryption purposes. Click Yes or No to proceed.
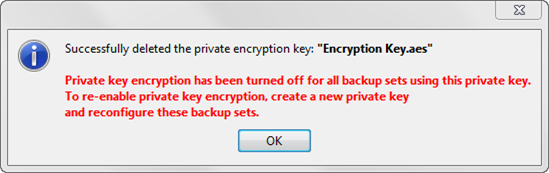
- Once the private key has been successfully deleted, a window will appear. Click OK to close the window.
 Feedback