

Managing Your Groups

- This article is for Windows and Mac
Summary:
You can create groups of users within your Carbonite account. By grouping users, you can easily find information about each group and find any users you are looking for. If you have not already created a group and moved users into that group, you may want to do so first.
Solution:
To view your groups, sign into your Carbonite account as an administrator at https://account.carbonite.com/.
Once signed in, click the Groups tab and you will be able to view any groups you have created.
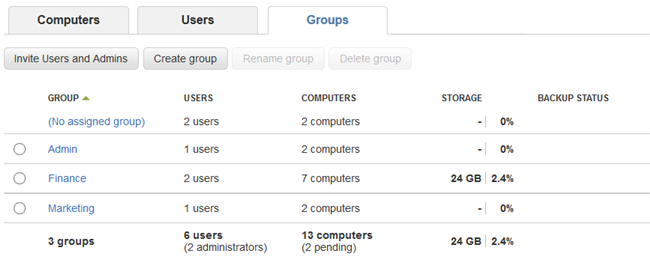
After you have created your group(s), you can perform the following actions.
The sections below are collapsed. Please click a section title to open / close the appropriate section.
Add more users to a group
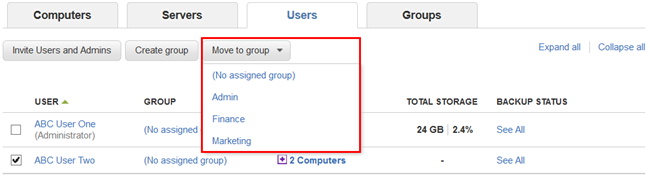
You can easily add more users to a group any time after the group is created. To do this, you must be signed into your Carbonite account as an administrator. Within the dashboard, click the Users tab and you will see all of your users and which group they are assigned.
If you look in the Groups column, the groups will be listed. Any user who has (No Assigned Group) listed within the Groups column means that they have not yet been assigned to a group. To assign these users to a group, mark the checkbox associated with the users and click the Move to group dropdown. Select the group you wish to move the users to from the dropdown, and the selected user(s) will be associated with that group.
Move Users Between Groups
At some point, you may need to move users from one group to another. A user can only belong in one group at a time. Moving them between groups associates them with the new group and disassociates them from the original group. Within Groups, click one of the groups in the list Group column.
The users within that group will be displayed. To move users to another group, mark the checkbox associated with that user and click Move to group.
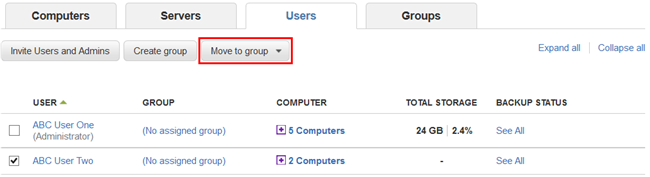
All other groups you have created will be displayed and you can select one from the list. After selecting the group from the list, the user will now belong to that group.
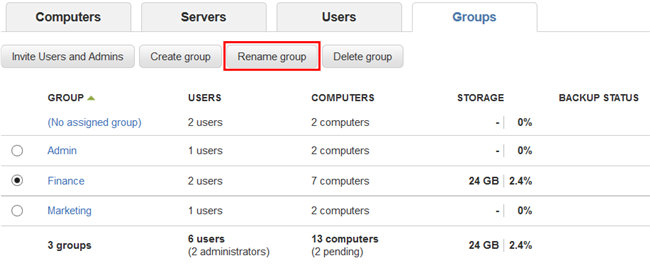
Rename a Group
You can easily rename groups as you see fit through the dashboard. Within your list of groups, select one of the groups from the list and you will see the Rename group and Delete group buttons accessible. To rename the group, click the Rename group button.
A new area will be displayed where you can change the name of the group. Type in a new name for the group and click Rename.
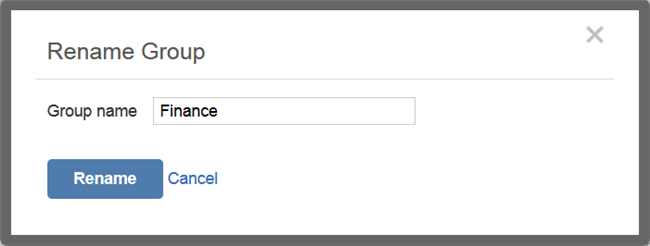
Your group will now have the new name.
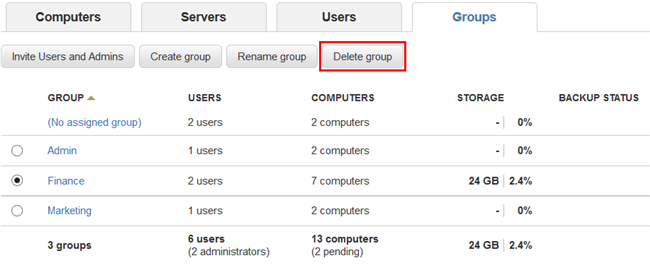
Delete a Group
When you delete a group, it will not affect any of the data that has already been backed up or delete any users from your account. Deleting a group only removes the group from the account and allows you choose a location where you would like to move the users. Within the Groups tab, select one of the groups from the list and you will see the Rename group and Delete group buttons accessible. Click the Delete group button to remove the group.
A new area will be displayed where you can select where to move the users of this group. The default setting is to remove the users from all groups so you can move them individually at a later time, but you can select a group from the Move this group's users to drop-down menu to move all of the included users as a unit to another group. Once your selection has been made click Delete to remove the group from your account.
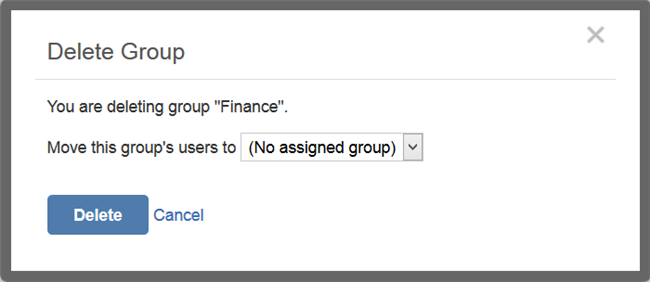
Your group will now be removed from the account and the users can be assigned to another group.
 Feedback