Manage backup rules for centrally managed policies
If you want administrator control over which files do and do not get backed up (a centrally-managed policy), you must define rules in the policy to identify the files to include or exclude in the backup.
- Rules can be specified for volumes, folders, files, and file types.
- Wildcards can be used.
- All rules are recursive, meaning the rule is automatically applied to the subfolders of the specified path.
- A rule for a file takes precedence over a rule for All Files.
-
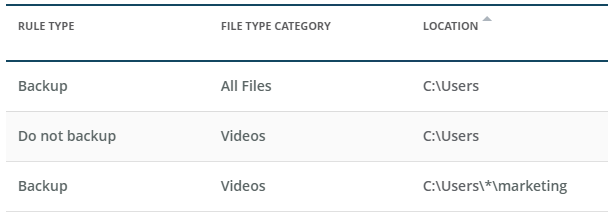
In the case of multiple rules, files use the rule that is closest in the folder structure to them. In the following example, all files and folders under C:\Users will be backed up (the first rule). However, video files will be excluded from C:\Users and its subfolders (the second rule), except the videos located in C:\Users\*\marketing and its subfolders will be included (the third rule).
- Some files and folders (including files without an extension) are excluded, by default, from backups. See Default exclusions for details.
- Do not specify the same rule in different ways. For example, do not create a rule for C:\Users\*\MyDocuments and %MyDocuments%.
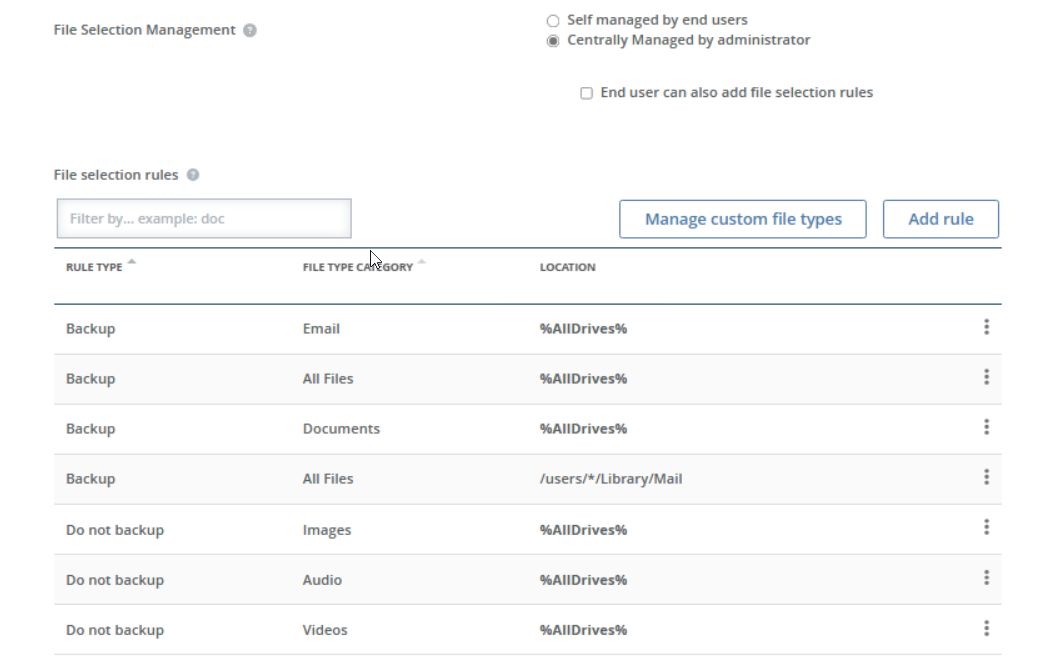
The following toolbar and table controls are available for the File selection rules section on the Edit policy details page.
Use the following procedure to view and/or edit the File selection rules.
-
Go to the Partner page and click the Policies tab.
If you want to manage backup rules for a company, go the Companies page and select a company. See the Administrator Guide for details. The Administrator Guide can be found at https://support.carbonite.com/guides/Endpoint/Admin/EndpointAdminGuide.htm.
- Locate the policy that contains the backup rules you want to view or modify. See View available policies for details on searching the table.
- Click on the policy's name.
-
Make sure File Selection Management is set to Centrally Managed by administrator to display the File selection rules section.
-
Edit the following settings as required.
- Filter by— Enter text to narrow the list to only rows that contain the filter text.
- Manage custom file types—Click this button to display a list of custom file types. These are specific files you want to include or exclude from the backup.
- Add custom file type—Click this button to add a new custom file type.
- File type name—Specify a name to identify this type of file.
- Copy from—Select an existing file type to pre-populate the File type extensions field (optional).
- File type extensions—Specify the file extensions for the files you want to include or exclude from the backup. Separate multiple extensions with a space.
Click Save once you have defined the new custom file type.
- Edit—Click this button to edit the file type definition. Use the same guidelines as outlined above when adding a custom file type. Click Save to save the changes.
- Table row overflow menu—Click Delete in the overflow menu of a table row to delete the file type definition. Confirm the deletion by clicking Delete.
- Close—Click this button to close the Manage custom file type dialog box.
- Add custom file type—Click this button to add a new custom file type.
- Add rule—Click this button to add a new file selection rule.
- Define type of rule—Select the type of rule you want to add.
- Backup—Select this option if you want the file types defined by this rule to be backed up.
- Do not backup—Select this option if you do not want the file types defined by this rule to be backed up.
- Select a file type—Select the type of file to be included in the rule.
- Pre-defined file type—Click on one of the pre-defined tiles to select that specific file type.
- Custom file type—If you have added custom file types, select a custom file type definition from the drop-down list. If you only have one custom file type, it is a single tile, not a drop-down list. Click Edit to modify the selected custom file type, or click Create custom file type to add a new custom file type.
- Define the file location—Select where to look for files that should be backed up
Commonly used file locations—If desired, select a common location on the devices to look for files that should be backed up. You can select all drives for both Windows and macOS devices, or for Windows devices only, you can select the system drive, desktop, documents folders, or user folders.
If you do not select anything, then the specified File location will be used.
File location—If you selected a commonly used location, this field is automatically populated. You can specify a folder, file, or wildcard that exists under the common location if desired. For example, if you selected the %Users% common Windows location, you could modify that to %Users%\*\Documents. However, do not modify the syntax of the common location (%AllDrives%, %SystemDrive%, %Desktop%, %Documents%, or %Users%) or enter any other shortcuts or macros. Only the pre-defined shortcuts or macros listed in Commonly used file locations can be used. Any other shortcut or macro will not work.
If you did not select a commonly used location, enter the file location on the devices to look for files that should be backed up. Make sure you use the proper syntax for the operating system. For example, use C:\folder\subfolder for Windows and /folder/subfolder for macOS. Each device will use the rules formatted for its operating system syntax.
- Define rule enforcement—If you are allowing users to add their own personal rules, you need to select if you want to allow the user rules to be able to override administrator rules. If you did not allow users to add their own personal rules, this option is not used.
- User rules cannot override administrator rules—The administrator rule will be enforced, regardless of user rules.
- User rules can override administrator rules—If a user rule conflicts with an administrator rule, the user rule will be enforced.
- Save & add another—Click this button to save the rule and refresh the Add a rule dialog box so that you can add another rule.
- Save—Click this button to save the rule and close the dialog box.
- Define type of rule—Select the type of rule you want to add.
-
Sort—You can sort the table by clicking on any column heading.
-
Table row overflow menu—In the overflow menu on the right of a table row, you can select the following actions.
- Edit rule—Click this option to edit the rule. Use the same guidelines as outlined above when adding a rule. Click Save to save the changes.
- Delete rule—Click this option to delete the rule. Confirm the deletion by clicking Delete rule.