

Restoring an Oracle Server

- This article is for Windows only
Previous versions of Carbonite Safe Server Backup (CSSB) support the restore of Oracle databases to the same server or to an alternate server. Oracle restores require access to the SQL*Plus utility that is included with the Oracle database.
Note: Ensure that the Restore Requirements and Additional Requirements are met before starting the restore.
Restore Requirements
The following requirements must be met, whether restoring to the original computer or to an alternate computer:
- The amandabackup / CarboniteUser user must have full access to the folder where the backups are stored.
- For cloud backups, this is the chosen Download Folder.
- For local backups, this is the folder where the backups are stored on the local disk.
- If the backups are stored in a network location, amandabackup / CarboniteUser must have access to the network folder. Please refer to How to Use External or Mapped Network Drives with CSSB.
- Likewise, the amandabackup / CarboniteUser user must have full access to the folder(s) to which the backups are being restored.
Additional Requirements
- SQL*Plus must be installed and accessible to the user performing the restore.
- The Oracle VSS Writer service must be started and functional.
Restoring to the Original Location
To restore Oracle server files to their original location, please choose the scenario that best fits your situation:
The sections below are collapsed. Please click the section title to open / close a particular section.
Restoring all ARCHIVELOG Databases
To restore all ARCHIVELOG databases to their original location:
- Ensure that the instance is not started.
- Navigate to the Restore page in the CSSB user interface, and select the backup run you want to restore.
- Select the database files to be restored i.e. the datafiles, server parameter file, etc. If the redo logs are missing, you must select the appropriate archived redo log files.
- Select Restore to Original Location from the dropdown menu. CSSB will restore the data to the same location it was backed up from.
- Select Overwrite Original as your Name Conflict Settings.
- After confirming your settings, click Restore Now to start the restore process.
- Once the database is successfully restored, open SQL*Plus and run the following commands:
cmd> sqlplus /nolog
sql> connect sys as sysdba
sql> shutdown immediate
sql> startup mount
sql> recover database using backup controlfile until cancel
Note: In cancel-based recovery, the recovery proceeds by prompting you with the suggested filenames of archived redo log files. The recovery stops when you specify CANCEL instead of a filename or when all redo logs have been applied to the datafiles.
- Continue applying the redo log files until the last log has been applied to the restored datafiles, then cancel recovery by executing the following command:
sql> CANCEL - To finish, enter the following SQL command string:
sql> alter database open resetlogs - To verify that the database is in the open state (read/write mode), use the following command:
sql> select name, open_mode from v$database
a Single Oracle Datafile in ARCHIVELOG
To restore a single Oracle datafile to its original location:
- Ensure that the database is either mounted or open. If the database is open, run SQL*Plus from the Command Prompt and connect to the database:
cmd> sqlplus sys as sysdba - To recover the datafile, the tablespace needs to be taken offline. In this example, let us assume that the tablespace ZTEST01 needs to be restored. Use the following command:
sql> ALTER TABLESPACE ZTEST01 OFFLINE IMMEDIATE - Navigate to the Restore page in the CSSB user interface, and select the backup run you want to restore.
- Select the database file to be restored i.e. ZTEST01.dbf in our example. If the redo logs are missing, select the appropriate archived redo log files as well.
- Select Restore to Original Location from the dropdown menu. CSSB will restore the data to the same location it was backed up from.
- Select Overwrite Original as your Name Conflict Settings.
- After confirming your settings, click Restore Now to start the restore process.
- Once the database is successfully restored, open SQL*Plus and run the following commands:
cmd> sqlplus /nolog
sql> connect sys as sysdba - If the restored data file is older than the redo log files, then a media recovery needs to be initiated using the following command:
sql> RECOVER TABLESPACE ZTEST01- You will see the following message:
Specify log: {<RET>=suggested | filename | AUTO | CANCEL}
- You will see the following message:
- Input the appropriate log file location. Type AUTO if you want Oracle to automatically find the appropriate logs and apply it.
Specify log: {<RET>=suggested | filename | AUTO | CANCEL}
AUTO
Log applied.
Media recovery complete. - Once you have recovered all the tablespaces that you have lost, bring the offline datafile or tablespace back online using the command:
sql> ALTER TABLESPACE ZTEST01 ONLINE>
Restoring all ARCHIVELOG Control Files
When Oracle database control files are backed up by Volume Shadow Copy Service, the backed up files are referred to as Snapshot Control files. For example, a control file by the name of CONTROL01.CTL is backed up under the name SNCFDATABASE_SID.ORA. Let's consider an example where the database SID is ORCL. In this case the snapshot control file will have the name SNCFORCL.ORA.
To restore all Control files in ARCHIVELOG:
- Ensure that the database is in NOMOUNT state or can be started in NOMOUNT state by the Oracle VSS writer. You don't have to shut down the database manually.
- Navigate to the Restore page in the CSSB user interface, and select the backup run you want to restore.
- Select the Snapshot Control file to be restored. In this case, it will be SNCFORCL.ORA.
- Select Restore to Original Location from the dropdown menu. CSSB will restore the data to the same location it was backed up from.
- Select Overwrite Original as your Name Conflict Settings.
- After confirming your settings, click Restore Now to start the restore process.
Note: CSSB automatically stops the Oracle instance while restoring and then starts it again when the restore operation is completed.
- Make three copies of the SNCFDATABASE_SID.ORA file called CONTROL01.CTL, CONTROL02.CTL, and CONTROL03.CTL.
- Copy these three files to the control files install location. The default location is ORAHOME\oradata\(DATABASE_SID)\. For the above example, copy the files to theC:\app\Administrator\oradata\ORCL\ directory.
- Run SQL*Plus from the Command Prompt Window:
cmd> sqlplus sys as sysdba - Shutdown the database and start it up again using the command:
sql> SHUTDOWN IMMEDIATE
sql> STARTUP MOUNT - Run the following command to get the database in a consistent state:
sql> RECOVER database using backup controlfile until cancel - Continue applying the redo log files until the last log has been applied to the restored datafiles, then cancel the recovery by executing the following command:
sql> CANCEL - Open the database with the RESETLOGS option:
sql> ALTER DATABASE OPEN RESETLOGS - The Oracle database is now recovered. To verify that the database is in the open state (read/write mode), use the following command:
SQL> select name, open_mode from v$database
Restoring the Server Parameter File
To restore the server parameter file to its original location:
- Navigate to the Restore page in the CSSB user interface, and select the backup run you want to restore.
- Select the server parameter file (spfile) to be restored. Usually, it is named SPFILEORACLE_SID.ORA. For example, if the SID of the database is ORCL, then the name of the spfile will be SPFILEORCL.ORA.
- Select Restore to Original Location from the dropdown menu. CSSB will restore the data to the same location it was backed up from.
- Select Overwrite Original as your Name Conflict Settings.
- After confirming your settings, click Restore Now to start the restore process.
- Once the server parameter file is successfully restored, run SQL*Plus from the Command Prompt:
cmd> sqlplus sys as sysdba - Shutdown the database and start it up again using the command:
sql> SHUTDOWN immediate
sql> STARTUP - To verify that the database is up and running, use the command:
sql> SELECT name, open_mode from v$database
Restoring NOARCHIVELOG Databases
To restore all NOARCHIVELOG datafiles to their original location:
- Navigate to the Restore page in the CSSB user interface, and select the backup run you want to restore.
- Select all the datafiles and control files to be restored. CSSB backs up one of the 3 control files i.e. CONTROL01.CTL.
- Select Restore to Original Location from the dropdown menu. CSSB will restore the data to the same location it was backed up from.
- Select Overwrite Original as your Name Conflict Settings.
- After confirming your settings, click Restore Now to start the restore process.
- Make two extra copies of the CONTROL01.CTL file called CONTROL02.CTL and CONTROL03.CTL. The CONTROL01.CTL file is located in the ORAHOME\ORADATA\DATABASE_SID directory.
- Once the data is successfully restored, open SQL*Plus and run the following commands:
cmd> sqlplus /nolog
sql> connect sys as sysdba
sql> shutdown immediate
sql> startup nomount
sql> ALTER DATABASE mount
sql> RECOVER DATABASE
sql> ALTER DATABASE open
Restoring to an Alternate Location
When Restore to Alternate Location is selected, CSSB will simply restore the selected Oracle files to disk. They must be imported manually into the Oracle database.
Restoring to a Different Computer
You can restore your backed up data originating from one computer to a different computer. This method is mostly used to create a clone of the original system. It is recommended that you install the same Windows Operating System (with the same service packs) on the restore computer as was installed on the original computer. This procedure requires some additional steps before you can launch the actual restore process. The steps are as follows:
The sections below are collapsed. Please click the section title to open / close a particular section.
For complete instructions on Installing Carbonite Safe Server Backup and Importing the Cloud Certificate, please refer to the knowledge base articles linked below:
Importing Existing Backup Sets
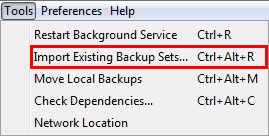
To import existing backup sets, select Tools from the menu option and click Import Existing Backup Sets.
A Import Existing Backup Sets window will appear. You will have the option to select Import Backup Sets from Cloud or Import Backup Sets from Local Directory.
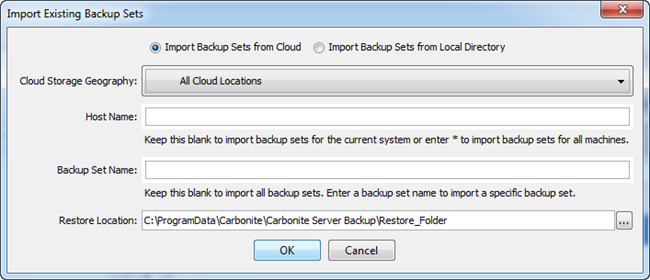
Within this screen, specify information for the following fields:
- Cloud Location - This field will only be visible when the radio button for Import Backup Sets from Cloud is selected. CSSB can back up your data to data centers across the globe. The default selection is All Cloud Locations.
- Host Name - This refers to the host name of the original computer, without the domain name.
- Enter a valid hostname to import backup sets only for the host provided.
- Enter an * (asterisk) to import backup sets for all of the computers which were backed up using CSSB.
- Leave this field blank to use the hostname of the computer on which CSSB is installed.
- Backup Set Name - This refers to the name of the backup set on the original computer when the backup was performed.
- Leave this field blank to import all backup sets.
- Use an * (asterisk) as a wildcard.
- Enter just an * to import all backup sets.
- Enter exchange* to import all backup set names that begin with exchange, such as exchangebackup, exchangeone, etc.
- The backup set name field is case sensitive.
- Restore Location - Information about the backup sets must be downloaded to the local computer temporarily as part of the Import Existing Backup Sets process. This field allows you to specify a temporary location on the local computer where the information is kept.
- Backup Data Location - This field will only be visible when the radio button for Import Backup Sets from Local Directory is selected. It refers to the directory in which the local backups are stored.
- You must specify the exact folder in which the local backups are stored. Sub-folders will not be scanned for backups.
Restoring the Backup Data
Once the backup sets have been successfully imported by CSSB, you can follow the normal restoration steps to restore an Oracle Server.
 Feedback