

Restoring Microsoft SharePoint

- This article is for Windows only
Summary:
This article describes restoring Microsoft SharePoint using Carbonite Safe Server Backup.
Solution:
Carbonite Safe Server Backup (CSSB) supports Content Recovery, Web Application Recovery and Disaster Recovery for Microsoft SharePoint. You can restore your data to the original backed up computer or to a different computer.
Content Recovery
Content recovery applies to being prepared for accidental updates or deletions of data, usually by end users such as deleting documents, tasks, calender items, etc. Content recovery can be done by restoring Web application's Content databases. Since CSSB does not support Roll-forward restores, if the restore is targeted to the original location, changes done after a backup will be lost. Therefore, one can restore the respective Web application's content databases to an alternate location and use third party tools to extract the required object.
Web Application Recovery
A web application recovery would be required in case of accidental deletion or corruption of the content databases. To recover a deleted or corrupted web application's content database to the original server, select the appropriate database files from the SharePoint server backup.
Restore Requirements
The following requirements must be met, whether restoring to the original computer or to an alternate computer:
- The amandabackup / CarboniteUser user must have full access to the folder where the backups are stored.
- For cloud backups, this is the chosen Download Folder.
- For local backups, this is the folder where the backups are stored on the local disk.
- If the backups are stored in a network location, amandabackup / CarboniteUser must have access to the network folder. Please refer to How to Use External or Mapped Network Drives with CSSB.
- Likewise, the amandabackup/ CarboniteUser user must have full access to the folder(s) to which the backups are being restored.
Restore Requirements for all SharePoint Restores
- SharePoint includes a Microsoft SQL Server component.
- The MSSQL component must be running, unless the rebuild system databases option is checked. Please see this Knowledge Base article for more information.
Additional Requirements
All Restore Requirements must be met before starting the restore.
Requirements for all SharePoint Restores to the Original Computer
- All SharePoint databases must be in the Normal state prior to restore.
- Stability can be verified from the SQL Management Studio. The Properties menu for each database will display its current state.
- The following services must be started.
- Windows SharePoint VSS Writer
- Windows SharePoint Services Tracing
- The applicable OSearch and SPSearch VSS Writer services must be enabled. The name of the controlling service depends on which version of SharePoint is installed.
- For SharePoint 2010
- The SPSearch VSS Writer is controlled by the SharePoint Foundation Search V4 service.
- The OSearch VSS Writer is controlled by the SharePoint Server Search 14 service.
- For SharePoint 2007
- The SPSearch VSS Writer is controlled by the Windows SharePoint Services Search service.
- The OSearch VSS Writer is controlled by the Office SharePoint Server Search service.
- For SharePoint 2010
Requirements for SharePoint Restores to An Alternate Computer
- The new computer must run the same version of SharePoint, with the same Service Packs, and the same embedded SQL Server as the original computer.
- The host name of the new computer must be exactly the same as the original computer.
- The instance name must exactly match the instance name from the original server.
- SharePoint must be installed to the same location as when the backup was run.
- All databases and log file locations must also match the original configuration.
Restore Locations
Carbonite Safe Server Backup allows SharePoint databases to be restored to their original location or to an alternate location. CSSB does not support Roll-forward restores for SharePoint. If a restore is targeted to the original location, any changes made to the database after the backup was performed will be lost.
Please choose the scenario that best fits your situation:
Restoring to the Original Computer
If Carbonite Safe Server Backup is already installed on your computer, you can open the user interface and begin restoring your data to your computer. Within the Restore page, Carbonite Safe Server Backup provides two options to restore Microsoft SharePoint:
The sections below are collapsed. Please click the section title to open / close a particular section.
Restoring to Original Location
Before the restore, the following SharePoint services are stopped:
- Windows SharePoint Services Administration
- Windows SharePoint Services Search
- Windows SharePoint Services Timer
- Office SharePoint Server Search
- IIS Admin Service
The selected SharePoint database(s) and log file(s) are restored to their original location. Index search files will be restored if all databases and logs within the backup are selected for restore. You can also select individual content databases to restore, but index search files will not be restored.
After the restore, CSSB utilizes the SharePoint VSS Writer to automatically detach and re-attach each database to the farm.
The services which were stopped before the restore operation are restarted.
Restoring to Alternate Location
When restoring to an alternate location, SharePoint services are not stopped or started prior to the restore. After the restore, CSSB does not utilize the SharePoint VSS Writer to detach and re-attach each database. The selected databases and log files are simply restored to their specified location on disk. Once restored, you will have to manually import them into SharePoint.
Restoring to a Different Computer
Backed up data can be restored to a different computer than the one it originated from. This process is mostly used to create a clone of the original system. It is recommended that you install the same Windows Operating System (with the same service packs) on the restore computer as was installed on the original computer. This procedure requires some additional steps before you can launch the actual restore process. The steps are as follows:
The sections below are collapsed. Please click the section title to open / close a particular section.
For complete instructions on Installing Carbonite Safe Server Backup and Importing the Cloud Certificate, please refer to the knowledge base articles linked below:
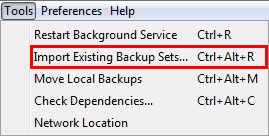
Importing Existing Backup Sets
To import existing backup sets, select Tools from the menu option and click Import Existing Backup Sets.
A Import Existing Backup Sets window will appear. You will have the option to select Import Backup Sets from Cloud or Import Backup Sets from Local Directory.
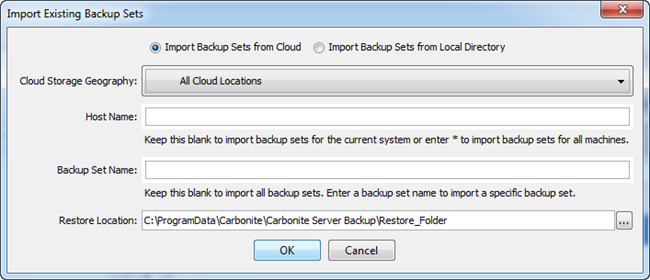
Within this screen, specify information for the following fields:
- Cloud Location - This field will only be visible when the radio button for Import Backup Sets from Cloud is selected. CSSB can back up your data to data centers across the globe. The default selection is All Cloud Locations.
- Host Name - This refers to the host name of the original computer, without the domain name.
- Enter a valid host name to import backup sets only for the host provided.
- Enter an * (asterisk) to import backup sets for all of the computers which were backed up using CSSB.
- Leave this field blank to use the host name of the computer on which CSSB is installed.
- Backup Set Name - This refers to the name of the backup set on the original computer when the backup was performed.
- Leave this field blank to import all backup sets.
- Use an * (asterisk) as a wildcard.
- Enter just an * to import all backup sets.
- Enter exchange* to import all backup set names that begin with exchange, such as exchangebackup, exchangeone, etc.
- The backup set name field is case sensitive.
- Restore Location - Information about the backup sets must be downloaded to the local computer temporarily as part of the Import Existing Backup Sets process. This field allows you to specify a temporary location on the local computer where the information is kept.
- Backup Data Location - This field will only be visible when the radio button for Import Backup Sets from Local Directory is selected. It refers to the directory in which the local backups are stored.
- You must specify the exact folder in which the local backups are stored. Sub-folders will not be scanned for backups.
Restoring the Backup Data
Once the backup sets have been successfully imported by CSSB, you can follow the normal restoration steps outlined in Restoring to Original Location or Restoring to Alternate Location.
 Feedback